
")
When you want to make large 3D prints because STL files are of the highest quality, like the ones you can find on Gambody marketplace, and allow you to upsize your project to life-size or even more, you should discover the main secrets of large-scale 3D printing. Do you want to install a giant Millennium Falcon in your living room? Do you dream of hanging a life-size Tyrannosaur Rex bust in your child’s bedroom?
Whatever your dreams are, keep reading to learn the steps you’ll have to take to achieve them.
")
Large-Scale 3D Printing
More and more hobbyists enjoy large 3D printing and work on giant models that won’t fit on a shelf and often don’t fit on the regular printer bed. The Premium sector on Gambody 3D printed marketplace is filled with incredible offers, and each one has been tested to print without errors and boasts such amazing details that upscaling most figures and models for 3D printing is a big must!
To begin working on your large 3D prints, you don’t have to switch your printer immediately and buy a large-format machine. Instead, you should learn more about 3D printing large objects on a standard desktop printer build plate. One of the methods is slicing or splitting the model in Fusion 360, Blender, Autodesk Maya 3D, Bambu Studio, Meshmixer, or a different software. Let’s look them up more closely.
Read also: Over 100 Fun 3D Printer Projects.
Split STL Software
When you don’t have a 3D printer for large objects, such as gMax 2 or more affordable FLSUN V400 3D printer, you must learn how to split STL files to fit on your printer’s bed.

You can try Fusion 360, Meshmixer, Tinkercad, Blender, Cura split model method, etc. Different slicers have unique features and tools that require time to become familiar with and a lot of practice to become a pro. In large-scale 3D printing, by splitting STL files, you should learn to make straight cuts to split a big part into smaller pieces or add aligners to follow the project’s creases. No matter how many parts you plan to create, it is best to identify them with numbers or letters to help you with model assembly.
Is it a complicated task? Nothing is impossible when you desire to work on big 3D prints with whatever machine brand you own. Let’s detail how exactly you can split a 3D model for printing.
Read also: Noble Life-Size Groot 3D Print by Jose Antonio.
How to Split a 3D Model for Printing
Take a closer look at the STL file you wish to split (Gambody will demonstrate the steps in several slicers using the Cloud Strife 3D printing model, which STL files you can also download to recreate in life-size).
General advice. If your project has many intricate details, avoid cutting through them or too close to them because you can damage the design. Remember the potential splits and how they can affect the number of supports you’ll have to use. The less is the best.

It’s also best to split with angles or planes, considering the structural integrity of the 3D printing figure or model. Don’t cut at the thinnest points, which are usually weak. The area where you cut has to have enough surface, especially if you have to assemble the parts after the split.
As you think of the best ways to split STL, ensure each piece can take the most of your 3D printer bed. This way, you can save time, filament (or resin), and your nerves.
Read also: Exceptional Life-Size Paul the Alien 3D Print: Interview with Michael Shaw on Making a Collectible Piece.
Shortly About Gambody Models
When you browse through Premium 3D Printing Models on gambody.com, you can find the precise size of every figure and model, from the smallest elf to the biggest demons and spacecraft. Thus, you can upscale them to your needs. The models’ description pages and images have a grid and scale that can help you figure out your project’s life-size dimensions.

To make large 3D prints in a correct life-size version, you must upscale all parts of your model to the same scale. In our case, it is essential to upscale the Cloud Strife figure to 8 times its original size (we use the FDM version). Gambody recommends you upscale FDM models to life-size versions unless you wish to download ready-to-print life-size projects such as Spider-Man Game Suite or Robot Maria.
It is best to use a 3D printer with a minimum print volume of 8.6 x 8.6 x 9.8 inches (220 mm x 220 mm x 250 mm) and figure out the maximum size you can print at a time.
Read also: Fabulous Life-Size 3D Printed Model for Game of Thrones Fans: Interview with Tatiana Rizou.
Autodesk Fusion 360
Autodesk Fusion (formerly Autodesk Fusion 360) is very popular among hobbyists. You can understand the steps you generally need to take to split STL in Fusion in the example below. Let’s slice the hand of Cloud Strife, pretending you wish to turn this figure into a large 3D print (life-size would look great on this character, by the way!).
Step 1. Launch Autodesk Fusion and import the part as mesh. Position it on the bed.

Step 2. Upscale it to 8 times its original size by choosing the “Scale Mesh” parameter from the “Mesh” menu. Use the “Scale Factor” 8.


Step 3. Gambody advises you to create a solid box with the maximum size of your 3D printer bed to avoid upscaling the 3D printing figures way too much.


Step 4. Select the plane you wish to use to split STL. It will be easier if you choose one of the cube faces for this task and make your offset plane about 5 percent smaller than the maximum size of the model you can fit on your 3D printer bed.

Step 5. Select the 3D printing part and the cut plane. Fill out the parameters just like in the image below:
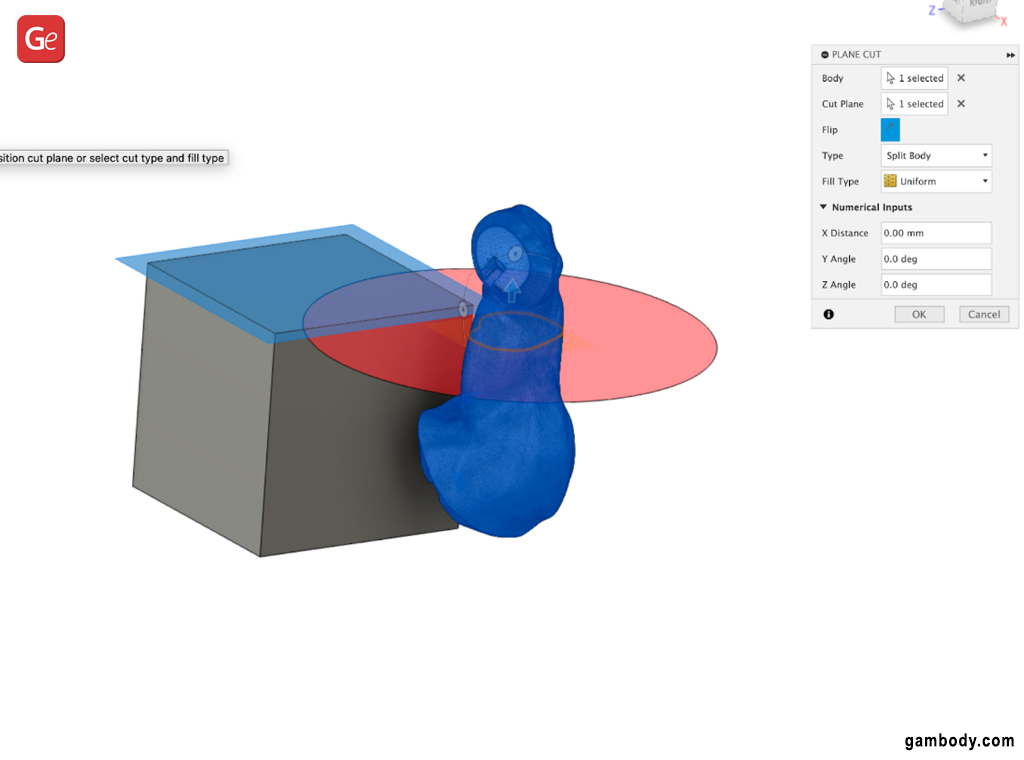
Step 6. Congratulations! You are ready to start 3D printing large parts, and you can use Fusion 360 to cut an STL file in half.

Read also: Free STL Editor: How to Edit and Repair STL Files (3D Models).
Bambu Studio
Let’s now split STL into parts using Bambu Studio. This open-source slicer has many great features. Cloud Strife’s hand is once again used as an example of what you should do to make life-size figures and models.
Step 1. Open the STL file in Bambu Studio and upscale it by 800 percent.

Step 2. Place the model in the most compact position.

Step 3. Select the cut plane, considering the position for 3D printing and the final appearance.

Step 4. Add pins (if you want).

Step 5. Repeat the steps above until all your 3D printing parts fit the printer bed. Ensure that the pins you add don’t interfere with each other but help you with future model assembly.

Step 6. Use 4 to 5 outer walls and 2 to 3 percent infill to ensure the part strength and minimal use of filament.

Read also: How to 3D Print Life-Size Iron Man Statue: Interview with David Maeseele.
Autodesk Maya 3D
When you are 3D printing large parts and wish to split STL with Autodesk Maya 3D, prepare for more steps than when using Bambu Studio or Fusion 360.
Step 1. Import your project into Maya 3D and position it.

Step 2. Using “Channel Box,” scale up your model to life-size by changing the “Scale” parameters for X, Y, and Z, where 1 = 100 percent.

Step 3. Create a cube matching the maximum build volume of your 3D printer to avoid upscaling a bigger model than you can potentially print.


Use the “Channel Box” and a “T” key to create a polyCube with a height of 0.12 mm. Other parameters don’t matter as much.

Step 4. Position the blade where you would like to split STL. Hold “Shift” while selecting the 3D printing part you wish to split and then the cube and choose “Booleans” for slicing.

- Method 1. Press and hold “Shift” and RMD and choose the “Difference (A-B)” in “Booleans” or select the parts and go to “Mesh” – “Boolenas” – “Difference (A-B). Remember to use the Shift+Alt+D combination to clear the cache, and your object is still considered as “solid” even though with a cut. Use the “Separate” option to split it.

")

- Method 2. Select the 3D printing part you wish to split and press-hold Shift+RMD while choosing “Mesh” – “Separate.”


- Select all the parts and use the “Mesh” – “Triangulate” option (by holding Shift+ RMB or through the Mesh menu) to export them correctly.


Now you can work on your huge 3D prints!
Read also: Walking Terminator Endoskeleton (How a Humanoid Robot Became a Nightmare Animatronic).
Blender
This open-source software for 3D modeling is very popular. It helps designers sculpt figures and work on complex models, although learning and improving your skills takes time. Its main advantage is that it’s free, and you can find a lot of tutorials online to assist you with printing large objects and help you split STL files according to your needs.
Blender is one of the most challenging STL splitter methods but offers various useful tools to complete this task. Bender options for how to split large 3D prints include adding angles (vertical or horizontal) or planes that can be angled however you need.
When making large 3D prints by upscaling a model such as Cloud Strife, follow this quick guide to splitting STL files.
Step 1. Import the file and position your object.

Step 2. Use the “real Size” to upscale the model by 800 percent. You can do this by clicking the “S” (Scale) key and entering the number 8 or by clicking the “N” to access the menu and entering “8.000” for “Scale” in the “Item.”

Step 3. Create a cube that is similar to your bed size. You can go to “Add” – “Mesh” and press “Cube” or use Shift+A combination and choose “Mesh” – “Cube.”


Now you can enter the “Size” parameters for your Cube or change the “Dimension” in “Item.”


Step 4. Create the blade. Use the Cube Z dimension as 0.00012 m.

Step 5. Position the blade where you wish to slice your 3D printing part, but make sure not to exceed the maximum 3D printer volume. Select the 3D printing part and choose “Add Modifier” – “Generate” – “Boolean.”

Step 6. Select the “Blade” in “Object” in “Modifiers” and click “Apply” to continue.

Step 7. Your object is still considered a solid one but with a slice. To complete slicing this STL, you have to “Separate” it. How is it possible to achieve this? Go to “Edit Mode” by selecting the object and pressing “TAB.”

Step 8. Select all the vertices of one of the object halves by moving the cursor and pressing the “L” key.

Step 9. Now press the “P” key and choose “Selection” in the pop-up menu.

Step 10. Return to the “Object Mode” by pressing “TAB” or through the menu.


Step 11. Select the 3D printing model and go to “Modifiers” – “Add Modifier” – “Generate” – “Triangulate” – “Apply” to export the parts correctly.


Step 12. Select the split parts and choose “File” – “Export,” where you can export them as STL files.

Step 13. Choose the correct “Operator Presets” option. The “Scale” should be “1000.000” to correctly export your split .stl files.

Read also: Free 3D Printing Software to Create 3D Prints.
Meshmixer
Meshmixer is one of the easiest ways to split STL into smaller parts. Autodesk stopped supporting this software, but you can still use it unless you decide to switch to Fusion 360 or another option. It is easier to use on Microsoft computers because Mac owners have to install Parallels visualization to work around. We’ll generally describe how you can use Meshmixer just to give you an idea of how it can help you with making big 3D prints.
These are the main steps for a large 3D printing split. We won’t show an example but will outline the major things to pay attention to.
Step 1. Upload the STL file you wish to split into Meshmixer.
Step 2. Press the “Edit” button and select “Plane Cut.”

Step 3. You will see a plane that you can control and position how you need. Once you split STL, the pop-up menu from the top left corner lets you keep both parts or one part of the split. Since you want to create a big 3D print, keep both.
Step 4. To separate one part from the second one, choose “Edit” and the option called “Separate Shells.” You’ll have two objects.
Step 5. Select one model’s split part and export it as STL or a different format (if you use OBJ or something else). Repeat this for every other part you’ve created.

Working with Locator Pins
In large-scale 3D printing, you split STL files to print bigger parts and glue the split objects to create one model. Since Meshmixer has no specific locator pin options, you can add a shape to your project and use it as the pin. It can be a cylinder, cube, etc.
You’ll have to add this shape between the two parts (halfway through), add it to one part, and subtract it from the other part. This way, you’ll have two parts with puzzle-like connections to help them glue better and avoid any shifting.

So, here is what you do once you split STL into several parts:
Step 1. Double-check that all the parts of your project are aligned. Hide one part by clicking the “eye” in the View – Object Browser.
Step 2. Choose your pin in a desired shape, drag it, and drop it in the approximate middle of your split area. Resize it to ensure it takes enough space and would help you glue the model better.
Step 3. As another browser appears in the upper left part of Meshmixer, select a drop-down menu and select “Create New Object” to not let your pin merge with the split parts.
Step 4. The pin will be aligned by Meshmixer perfectly well between your split parts. It’s a bonus feature! While pressing the “Alt” key, click on the split part and your pin through the Object Browser.
Step 5. Select each model’s split part and export it as STL or a different format (if you use OBJ or something else). Repeat this for every other part you’ve created. The pin will be inside the model.
Step 6. Go to the Object Browser and make both split parts visible along with the pin. With this done, select the pin locater and press “Copy” in the Object Browser. Make the original pin invisible, but keep this new copy visible.
Step 7. In the Object Browser, select the model, and after this, select the copy of a locator pin. In a pop-up browser, choose “Boolean Difference” composition mode to subtract the pin from your model. You will see a hole in the place where the pin was, while the other part will show a protruding cute you created earlier.
Step 8. It is best to keep the hole slightly bigger than the locator pin. Once you are happy with the result, you can export your model parts as STL files for 3D printing.
Large-scale 3D printing is an incredible adventure that allows you to work on big 3D prints of your favorite characters, spaceships, robots, and other models. If the instructions on how to split a 3D model for printing using popular slicers are too complicated or require too much time, you can find amazing ready-to-print life-size projects on Gambody marketplace. Please share the photos of your finished 3D printed figures on our 3D Printing Community on Facebook.
(Visited 34 times, 1 visits today)
