

Data protection is a high priority, particularly as organizations face increasing cybersecurity threats. Maintaining the security of customer data is top priority for AWS and Salesforce. With AWS PrivateLink, Salesforce Private Connect eliminates common security risks associated with public endpoints. Salesforce Private Connect now works with Salesforce Data Cloud to keep your customer data secure when using with key services like Agentforce.
In Part 2 of this series, we discussed the architecture and implementation details of cross-Region data sharing between Salesforce Data Cloud and AWS accounts. In this post, we discuss how to create AWS endpoint services to improve data security with Private Connect for Salesforce Data Cloud.
Solution overview
In this example, we configure PrivateLink for an Amazon Redshift instance to enable direct, private connectivity from Salesforce Data Cloud. AWS recommends that organizations use an Amazon Redshift managed VPC endpoint (powered by PrivateLink) to privately access a Redshift cluster or serverless workgroup. For details about best practices, refer to Enable private access to Amazon Redshift from your client applications in another VPC.
However, some organizations might prefer to use PrivateLink managed by themselves—for example, a Redshift managed VPC endpoint is not yet available in Salesforce Data Cloud, and you need to manage your PrivateLink connection. This post focuses on the solution to configure self-managed PrivateLink between Salesforce Data Cloud and Amazon Redshift in your AWS account to establish private connectivity.
The following architecture diagram shows the steps for setting up private connectivity between Salesforce Data Cloud and Amazon Redshift in your AWS account.

To set up private connectivity between Salesforce Data Cloud and Amazon Redshift, we use the following resources:
Prerequisites
To complete the steps in this post, you must already have Amazon Redshift running in a private subnet and have the permissions to manage it.
Create a security group for the Network Load Balancer
The security group acts as a virtual firewall. The only traffic that reaches the instance is the traffic allowed by the security group rules. To enhance the security posture, you only want to allow traffic to Redshift instances. Complete the following steps to create a security group for your Network Load Balancer (NLB):
- On the Amazon VPC console, choose Security groups in the navigation pane.
- Choose Create security group.
- Enter a name and description for the security group.
- For VPC, use the same virtual private cloud (VPC) as your Redshift cluster.
- For Inbound rules, add a rule to allow traffic to ingress the listening port 5439 on the load balancer.

- For Outbound rules, add a rule to allow traffic to your Redshift instance.

- Choose Create security group.
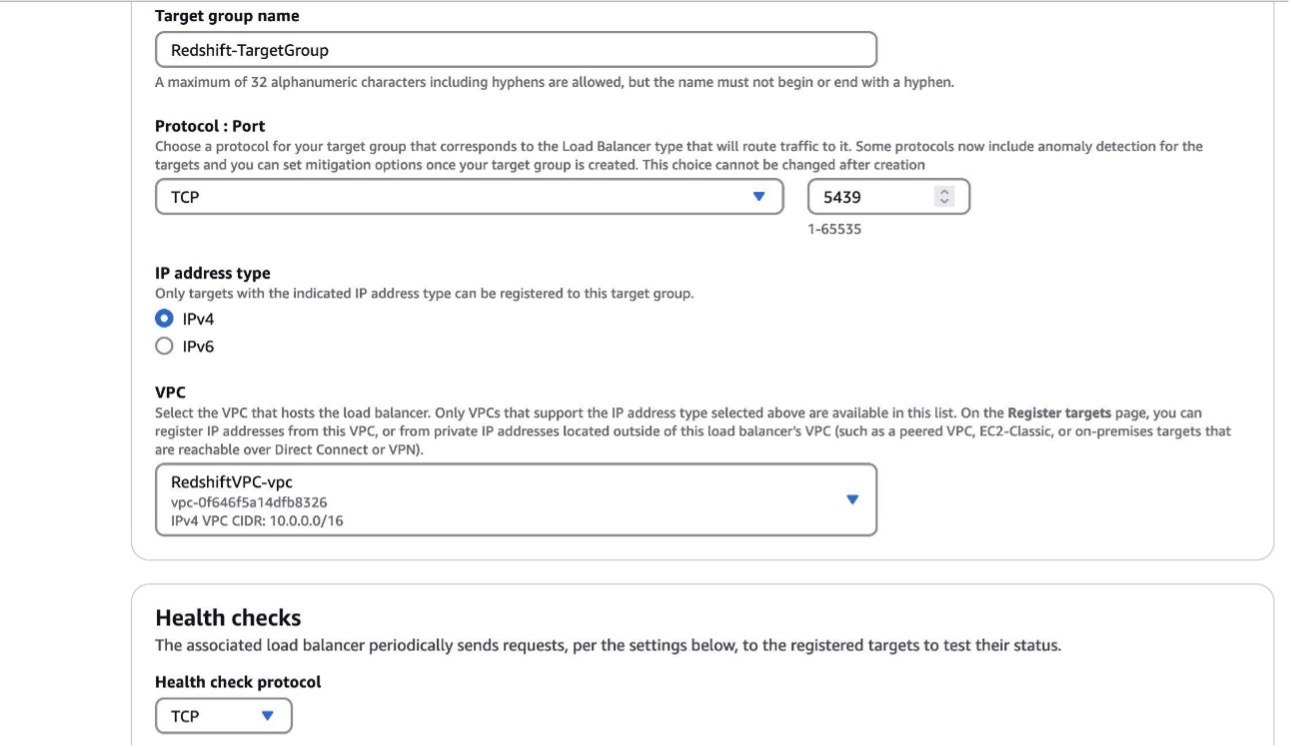
Create a target group
Complete the following steps to create a target group:
- On the Amazon EC2 console, under Load balancing in the navigation pane, choose Target groups.
- Choose Create target group.
- For Choose a target type, select IP addresses.

- For Protocol: Port, choose TCP and port 5436 (if your Redshift cluster runs on a different port, change the port accordingly).
- For IP address type, select IPv4.
- For VPC, choose the same VPC as your Redshift cluster.
- Choose Next.
- For Enter an IPv4 address from a VPC subnet, enter your Amazon Redshift IP address.
To locate this address, navigate to your cluster details on the Amazon Redshift console, choose the Properties tab, and under Network and security settings, expand VPC endpoint connection details and copy the private address of the network interface. If you’re using Amazon Redshift Serverless, navigate to the workgroup home page. The Amazon Redshift IPv4 addresses can be located in the Network and security section under Data access when you choose VPC endpoint ID.

- After you add the IP address, choose Include as pending below, then choose Create target group.

Create a load balancer
Complete the following steps to create a load balancer:
- On the Amazon EC2 console, choose Load balancers in the navigation pane.
- Choose Create load balancer.
- Choose Network.
- For Load balancer name, enter a name.
- For Scheme, select Internal.
- For Load balancer address type, select IPv4.
- For VPC, use the VPC that your target group is in.

- For Availably Zones, select the Availability Zone where the Redshift cluster is running.
- For Security groups, choose the security group you created in the previous step.
- For Listener details, add a listener that points to the target group created in the last step:
- For Protocol, choose TCP.
- For Port, use 5439.
- For Default action, choose Redshift-TargetGroup.
- Choose Create load balancer.


Make sure that the registered targets in the target group are healthy before proceeding. Also make sure that the target group has a target for all Availability Zones in your AWS Region or the NLB has the Cross-zone load balancing attribute enabled.

In the load balancer’s security setting, make sure that Enforce inbound rules on PrivateLink traffic is off.

Create an endpoint service
Complete the following steps to create an endpoint service:
- On the Amazon VPC console, choose Endpoint services in the navigation pane.
- Choose Create endpoint service.
- For Load balancer type, choose Network.
- For Available load balancers, select the load balancer you created in the last step
- From Supported Regions, select an additional region if Data Cloud isn’t hosted in the same AWS region as the Redshift instance. For additional settings leave Acceptance required.
If this is selected, later, when the Salesforce Data Cloud endpoint is created to connect to the endpoint service, you will need to come back to this page to accept the connection. If not selected, the connection will be built directly.
- For Supported IP address type, select IPv4.
- Choose Create.

Next, you need to allow Salesforce principals.
- After you create the endpoint service, choose Allow principals.
- In another browser, navigate to Salesforce Data Cloud Setup.
- Under External Integrations, access the new Private Connect menu item.
- Create a new private network route to Amazon Redshift.

- Copy the principal ID.

- Return to the endpoint service creation page.
- For Principals to add, enter the principal ID.
- Copy the endpoint service name.
- Choose Allow principals.

- Return to the Salesforce Data Cloud private network configuration page.
- For Route Name, enter the endpoint service name.
- Choose Save.

The route status should show as Allocating.

If you opted to accept connections in the previous step, you will now need to accept the connection from Salesforce Data Cloud.
- On the Amazon VPC console, navigate to the endpoint service.
- On the Endpoint connections tab, locate your pending connection request.

- Accept the endpoint connection request from Salesforce Data Cloud.

Navigate to the Salesforce Data Cloud setup and wait 30 seconds, then refresh the private connect route so the status shows as Ready.

You can now use this route when creating a connection with Amazon Redshift. For additional details, refer to Part 1 of this series.

Amazon Redshift federation PrivateLink failover
Now that we have discussed how to configure PrivateLink to use with Private Connect for Salesforce Data Cloud, let’s discuss Amazon Redshift federation PrivateLink failover scenarios.
You can choose to deploy your Redshift clusters in three different deployment modes:
- Amazon Redshift provisioned in a Single-AZ RA3 cluster
- Amazon Redshift provisioned in a Multi-AZ RA3 cluster
- Amazon Redshift Serverless
PrivateLink relies on a customer managed NLB connected to service endpoints using IP address target groups. The target group has the IP addresses of your Redshift instance. If there is a change in IP address targets, the NLB target group must be updated to the new IP addresses associated with the service. Failover behavior for Amazon Redshift will differ based on the deployment mode you employ.
This section describes PrivateLink failover scenarios for these three deployment modes.
Amazon Redshift provisioned in a Single-AZ RA3 cluster
RA3 nodes support provisioned cluster VPC endpoints, which decouple the backend infrastructure from the cluster endpoint used for access. When you create or restore an RA3 cluster, Amazon Redshift uses a port within the ranges of 5431–5455 or 8191–8215. When the cluster is set to a port in one of these ranges, Amazon Redshift automatically creates a VPC endpoint in your AWS account for the cluster and attaches network interfaces with a private IP for each Availability Zone in the cluster. For the PrivateLink configuration, you use the IP associated with the VPC endpoint as the target for the frontend NLB. You can identify the IP address of the VPC endpoint on the Amazon Redshift console or by doing a describe-clusters query on the Redshift cluster.


Amazon Redshift will not remove a network interface associated with a VPC endpoint unless you add an additional subnet to an existing Availability Zone or remove a subnet using Amazon Redshift APIs. We recommend that you don’t add multiple subnets to an Availability Zone to avoid disruption. There might be failover scenarios where additional network interfaces are added to a VPC endpoint.
In RA3 clusters, the nodes are automatically recovered and replaced as needed by Amazon Redshift. The cluster’s VPC endpoint will not change even if the leader node is replaced.
Cluster relocation is an optional feature that allows Amazon Redshift to move a cluster to another Availability Zone without any loss of data or changes to your applications. When cluster relocation is turned on, Amazon Redshift might choose to relocate clusters in some situations. In particular, this happens where issues in the current Availability Zone prevent optimal cluster operation or to improve service availability. You can also invoke the relocation function in cases where resource constraints in a given Availability Zone are disrupting cluster operations. When a Redshift cluster is relocated to a new Availability Zone, the new cluster has the same VPC endpoint but a new network interface is added in the new Availability Zone. The new private address should be added to the NLB’s target group to optimize availability and performance.

In the case that a cluster has failed and can’t be recovered automatically, you have to initiate a restore of the cluster from a previous snapshot. This action generates a new cluster with a new DNS name, connection string, and VPC endpoint and IP address for the cluster. You have to update the NLB with the new IP for the VPC endpoint of the new cluster.
Amazon Redshift provisioned in a Multi-AZ RA3 cluster
Amazon Redshift supports Multi-AZ deployments for provisioned RA3 clusters. By using Multi-AZ deployments, your Redshift data warehouse can continue operating in failure scenarios when an unexpected event happens in an Availability Zone. A Multi-AZ deployment deploys compute resources in two Availability Zones, and these compute resources can be accessed through a single endpoint. In the case of a failure of the primary nodes, Multi-AZ clusters will make secondary nodes primary and deploy a new secondary stack in another Availability Zone. The following diagram illustrates this architecture.

Multi-AZ clusters deploy VPC endpoints that point to network interfaces in two Availability Zones, which should be configured as a part of the NLB target group. To configure the VPC endpoints in the NLB target group, you can identify the IP addresses of the VPC endpoint using the Amazon Redshift console or by doing a describe-clusters query on the Redshift cluster. In a failover scenario, VPC endpoint IPs will not change and the NLB doesn’t require an update.
Amazon Redshift will not remove a network interface associated with a VPC endpoint unless you add an additional subnet in to an existing Availability Zone or remove a subnet using Amazon Redshift APIs. We recommend that you don’t add multiple subnets to an Availability Zone to avoid disruption.

Amazon Redshift Serverless
Redshift Serverless provides managed infrastructure. You can perform the get-workgroup query to get the workgroup’s VpcEndpoint IPs. IPs should be configured in the target group of the PrivateLink NLB. Because this is a managed service, the failover is managed by AWS. During the event of an underlying Availability Zone failure, the workgroup might get a new set of IPs. You can frequently query the workgroup configuration or DNS record for the Redshift cluster to check if IP addresses have changed and update the NLB accordingly.

Automating IP address management
In scenarios where Amazon Redshift operations might change the IP address of the endpoint needed for Amazon Redshift connectivity, you can automate the update of NLB network targets by monitoring the results for cluster DNS resolution, using describe-cluster or get-workgroup queries, and using an AWS Lambda function to update the NLB target group configuration.
You can periodically (on a schedule) query the DNS of the Redshift cluster for IP address resolution. Use a Lambda function to compare and update the IP target groups for the NLB. For an example of this solution, see Hostname-as-Target for Network Load Balancers.
For legacy DS2 clusters where the IP address of the leader node must be explicitly monitored, you can configure Amazon CloudWatch metrics to monitor the HealthStatus of the leader node. You can configure the metric to trigger an alarm, which alerts an Amazon Simple Notification Service (Amazon SNS) topic and invokes a Lambda function to reconcile the NLB target group.
For backup and restore patterns, you can create a rule in Amazon EventBridge triggered on the RestoreFromClusterSnapshot API action, which invokes a Lambda function to update the NLB with the new IP addresses of the cluster.
For a cluster relocation pattern, you can trigger an event based on the Amazon Redshift ModifyCluster availability-zone-relocation API action.
Conclusion
In this post, we discussed how to use AWS endpoint services to improve data security with Private Connect for Salesforce Data Cloud. If you are currently using the Salesforce Data Cloud zero-copy integration with Amazon Redshift, we recommend you follow the steps provided in this post to make the network connection between Salesforce and AWS secure. Reach out to your Salesforce and AWS support teams if you need additional support to implement this solution.
About the authors
 Yogesh Dhimate is a Sr. Partner Solutions Architect at AWS, leading technology partnership with Salesforce. Prior to joining AWS, Yogesh worked with leading companies including Salesforce driving their industry solution initiatives. With over 20 years of experience in product management and solutions architecture Yogesh brings unique perspective in cloud computing and artificial intelligence.
 Avijit Goswami is a Principal Solutions Architect at AWS specialized in data and analytics. He supports AWS strategic customers in building high-performing, secure, and scalable data lake solutions on AWS using AWS managed services and open source solutions. Outside of his work, Avijit likes to travel, hike, watch sports, and listen to music.
 Ife Stewart is a Principal Solutions Architect in the Strategic ISV segment at AWS. She has been engaged with Salesforce Data Cloud over the last 2 years to help build integrated customer experiences across Salesforce and AWS. Ife has over 10 years of experience in technology. She is an advocate for diversity and inclusion in the technology field.
 Mike Patterson is a Senior Customer Solutions Manager in the Strategic ISV segment at AWS. He has partnered with Salesforce Data Cloud to align business objectives with innovative AWS solutions to achieve impactful customer experiences. In his spare time, he enjoys spending time with his family, sports, and outdoor activities.
 Drew Loika is a Director of Product Management at Salesforce and has spent over 15 years delivering customer value via data platforms and services. When not diving deep with customers on what would help them be more successful, he enjoys the acts of making, growing, and exploring the great outdoors.
