

Star Trek Borg is probably the most unusual starship not only in the Star Trek universe but among hundreds of other spaceship 3D models you can find on Gambody. Firstly, Borg Cube is a cube. Secondly, it is much more than just a cube because it boasts an intricate exterior design and iconic architecture, even though it lacks the traditional ship compartments.
Let’s take a closer look at the Borg Cube model 3D printed by Brian Spradlin, who shared the photos of his creation and tips on building his Borg ship with Gambody community. This enthusiast was also kind enough to share his tips and advice on completing his astonishing Star Trek 3D print featuring LED wiring with our blog readers.

Borg Cube
First appearing in Star Trek TNG (The Next Generation), the Borg have symbolized the juggernaut against which “resistance is futile,” and the impressive Borg Cube model has become a popular spacecraft 3D model to make for personal collection.
The cube-shaped Borg ship is an impressive 3D printing vessel with an incredible level of detail and outstanding quality. You can download Borg Cube STL files and recreate this static assembly project, following the ideas used by Spradlin.
Interview with Star Trek Borg Ship Maker
1. Hello, Brian! Thank you for sharing images of your incredible Star Trek Borg 3D print with Gambody community. It looks fantastic! When did you first learn about 3D printing?
I’ve been 3D printing since somewhere around 2014. I started out with one of the Printrbot Simple wooden 3D printers. Over the past 11 years I upgraded to Printrbot’s all-metal version, then to a Prusa MK2, which I upgraded several times. Now, I’ve moved on to the Prusa XL with five print heads so I can produce multi-color prints. I’ve always enjoyed being able to create physical versions of things that weren’t available in stores.
Read also: Best Cheap 3D Printer for a Beginner.
2. What are your favorite Star Trek 3D models besides the Borg ship?
I don’t really stick to any one sci-fi genre. Star Trek is one of my favorites, but most of the main starships from the shows could be found in stores or model kits over the years. What I’d never been able to find was a really good, detailed version of the Borg Cube. I always wanted something that highlighted all the pipes and conduits that made up the ship. There were a few digital models I found online that looked ok, but they weren’t suited to 3D printing. I tried to print a few and just ended up frustrated.

Borg Cube size: How big is a Borg Cube? In the Star Trek TNG, an ordinary Borg spaceship side was about 9,842 feet (3 kilometers), with the ship boasting a total volume of 27 cubic kilometers. Gambody’s 3D model of a spaceship is much smaller. Its FFF/FDM version is 21.69 inch (551 mm) tall, 21.69 inch (551 mm) wide, and 22 inch (559 mm) deep if printed at 100%.
3. You printed Borg Cube at 60% scale. Why did you choose this particular scale for your project?
I’d love to see the Borg Cube model at full scale someday; there just wasn’t any good way I could display it at my house at that size. I knew at the start that I had a limited amount of space available in my office to display Star Trek Borg once it was done. I have collectible items on shelves all around me, but couldn’t justify taking up the space that a 100% scale would use. I did some quick measuring and found that the top of my bookshelves would be a perfect spot if I went with a 60% scale, with space for the included stand and a gap between it and the ceiling. It also retained all the details I wanted from the 3D model of a spaceship with my 0.4mm nozzle-size FDM printer.

4. You mentioned that you printed Star Trek Borg with black and gray PLA. Which 3D printer did you use?
At the time of the project, I had just upgraded to a Prusa XL, so all of the parts were printed on that machine. I had the option to print with dual colors since I started with the 2-head model, but, honestly, I felt that the layers in the model itself worked best in different colors with just some paint highlights later. I looked at as many photos of the Borg Cube from the original Star Trek TNG TV shows as I could find to work out what color I wanted to use. In some cases, it looked mostly black, in others, it looked almost entirely gray. In the end, I decided to layer the colors and go with something unique for my personal collection.

Borg material: In the Star Trek universe, the Borg Cube ship has a double-layered tritanium hull. It is a super strong and durable alloy. Borg spaceship is also reinforced with ablative armor. However, when it comes to transforming the spaceship STL files into a physical form, most hobbyists choose a different Borg material, mostly PLA or resin.
5. Do you remember how long it took you to finish 3D printing all 128 parts of this 3D model of a spaceship from Star Trek?
I don’t recall the exact number of days. I started printing the first squares around mid-January, and my final photos of the build are from February 2nd. So, it was somewhere just over two weeks of printing and assembly. My printer wasn’t running constantly, but I remember printing two or three batches of Borg Cube parts on most days. Then, there was the painting and assembly work. I also spent a bit of time designing the LED harness for the interior lights, which was after the main body prints had been completed.
Read also: Fantastic USS Defiant Star Trek 3D Print (Tips & Tricks by Anthony Sforza).
6. How much PLA did your Star Trek Borg require?
I used almost four standard spools of black and one spool of gray PLA filament by the time I was done. Some of that was used with re-prints where I had some bed adhesion issues and the thinner pieces curled up. The final printed pieces of Borg Cube were probably closer to three spools of black material.
7. How did you get the idea to use acrylic paint markers to add golden and silver highlights to PLA? Is this process time-consuming?
I had another project from the previous year where I was trying to add chrome details to a 3D print and found some advice online about good paint pens that could give me close to the look I wanted. I did a bit more research when I started printing the Borg Cube from Star Trek TNG and landed on a brand of acrylic paint pen, Artistro, that had both gold and silver that looked pretty good when I tested them on the black PLA I was using. Since they’re paint pens, it didn’t require as much setup or cleanup time to use, so the highlighting went pretty quickly. I stuck to small areas in the Borg Cube model that looked like vents or sheets of paneling that I’d be able to see through the layers once they were assembled. It’s definitely something I’ll do again with future models!


8. Where did you learn about applying black hot glue to attach layers of PLA? Would you recommend this method to other hobbyists?
I liked that the Borg Cube model included the pegs that fit into each panel so there weren’t any gaps after assembly. But I knew that if I used my normal process of super gluing them together, I’d get too much of the typical white “haze” in each spot, especially with the black PLA. I considered using black two-part epoxy that I’ve had good success with in the past, but that required much more time to set than I wanted to take. It also allowed the pieces to shift after gluing unless I weighed them down while they dried. I also considered using a soldering tip to just re-melt the PLA together at each connection. In that case I didn’t feel I had enough control or would leave enough plastic to fuse it properly. Finally, I did some testing with black hot glue, which I’d used a few years earlier for another project, and it worked great for The Borg ship. It was quick to set and gave me a strong bond between each layer, which was perfect for my build! If others want to do the same, I would just mention that the glue will look glossy, while the PLA often is more matte. Other people might want to paint the glue with a matte black later, especially if the 100% scale shows the spots more obviously.

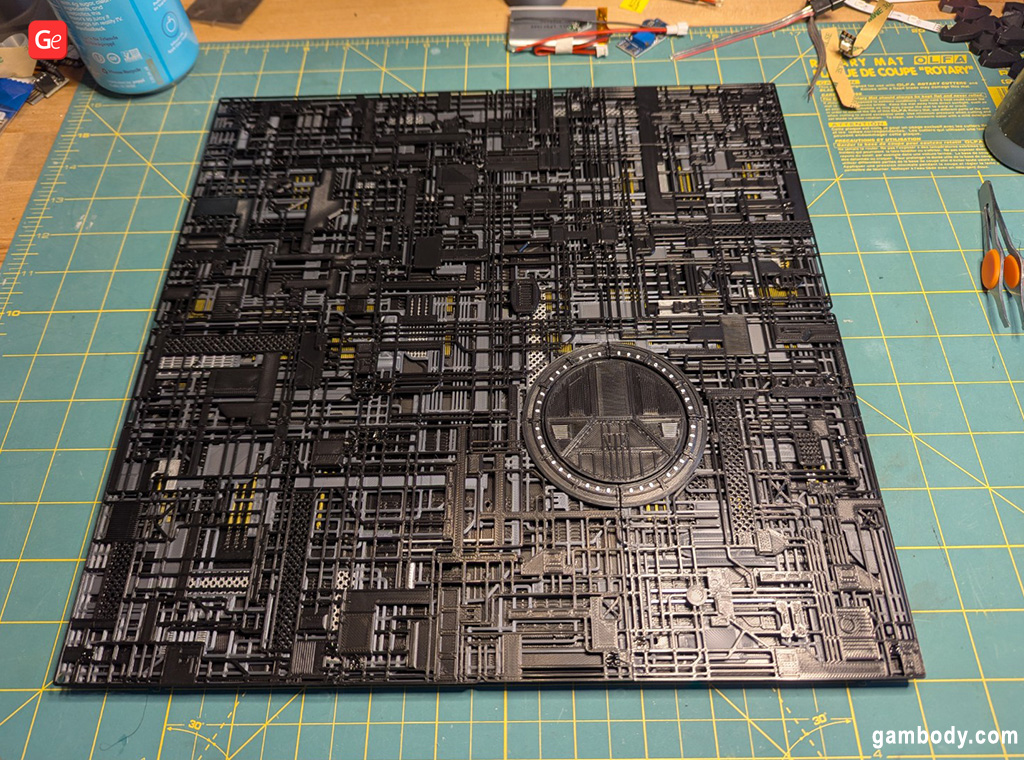
9. How did you discover your method of blocking the internal light from the seams using strips of duct tape and packing foam? Can you explain it in more detail, please?
I started the project with a plan to use the black hot glue to fill the spaces between each assembled piece of Borg ship to prevent light bleeding through the small gaps. But after assembling the bottom face of the Borg Cube I realized it was difficult to get to exactly the places I needed. I thought about using black electrical tape, but the adhesive on that isn’t as strong as I wanted. I’ve used aluminum duct tape for light blocking on other projects and realized it would be really easy to cut strips that could seal my cube faces and would stay in place. The adhesive on aluminum duct tape is meant to handle high heat, so it stays where you put it!

After that, I knew I wanted something to diffuse the light coming out from the center of the Borg Cube for the holes built into the model. I didn’t want to just leave the existing holes empty because you’d see the single points of LED light as you moved around the spaceship when it was on. I’ve played around with ways to diffuse LEDs in other projects and did some quick tests to see what would work with the way the Star Trek TNG Cube was configured. Normal printer paper did an ok job, but blocked more of the light than I wanted. Wrapping the LEDs in the center with fiber stuffing, like you have in stuffed animals, also worked ok, but didn’t give an even distribution of light out to the corners. I tried some tissue paper, which was pretty close, but not quite the right look I was after. I finally settled on the thin packing foam after seeing how it kept the light evenly distributed across the surface of Borg Cube model and let more light through than the other materials I’d tried.

Read also: How to Put Up LED Lights in a 3D Printed Model.
10. How can hobbyists use tissue or printer paper to achieve a similar light-blocking effect?
Both printer and tissue paper are good substitutes if you just want the green color, but aren’t worried about it being quite as bright during the day. It diffuses the light to the edges nicely, and the thinner the tissue paper, the more light you get through. It’s really personal preference for anyone who wants to work with it.

11. To clarify, did you use no post-processing or regular painting and leave PLA the way it was after printing, just adding the highlights with markers? Or was there more work to do before you started assembling the Borg Cube layers?
There was very little post-processing that I had to do with any of the parts of Star Trek Borg Cube. Some of the exterior layer pieces needed support applied in a few small places, but not many. Removing those supports was all I did before adding the highlights with the paint pens. I considered adding a layer of enamel or acrylic spray sealer over top of my painted pieces, but decided against it in the end. The painted parts are all on the two interior layers, with the final layer being just black PLA. That keeps the paint from being touched when the Borg Cube is handled, so it’s been fine.
12. You mentioned designing and printing an interior Borg Cube scaffold to hold your multi-color LEDs. What software did you use? Can other enthusiasts download and use your design to finish their Star Trek Borg?
I used Fusion 360 to design the scaffolding that I used for my interior lighting. Since it was designed to fit the 60% scaled Borg ship model and the fairy light RBG LEDs I used, it doesn’t quite scale to work with the Borg Cube 3D model at 100%. For the full-scale model, it might not provide enough light with the number of LEDs I used. Scaling the scaffolding up would make the distance between each LED holder too long for the fairy lights I used.

But if anyone is interested in using it at that scale, or modifying it to different scales, they can go to Printables.

13. You used four LEDs per Borg Cube side (fairy light RGB lights). How did you select this number per side?
I did some quick tests with the LEDs before I built the interior holder, just turning on a few of the LEDs and seeing how much light I could see from the outside of the Borg Cube. I also wanted a number that I could run from a LIPO battery for a few hours, so I went with the minimum that I felt still lit up the space I needed.
14. Did you perform any tests with your Arduino controller running WLED before finishing the Star Trek TNG project?
I’ve used the WLED software on two other projects before Borg Cube model. In most of my other projects it’s been used for multi-color animations. In this case, the primary mode I use is a solid green, so it was definitely more powerful than I needed just for that. I could have just used strings of green LEDs and a normal Arduino to schedule times to turn it on or off. But I’ve also used the WLED program to add some flashing animations to the Star Trek Borg Cube, making it look more like a battle-damaged or low-powered craft. There is a large number of out-of-the-box options with that program, which makes it great for 3D model lighting.

15. Where do you display your Star Trek Borg?
I have the Borg Cube on the top of my bookshelf in my office, just behind where I sit for work each day. It’s connected to a USB power supply, so the WLED program can turn it on at sunset every evening. I often notice the green glow near the ceiling in the evenings when I walk past my office door.

16. What is your next 3D printing model?
I’m not certain what I’ll 3D print next. I’ve really enjoyed printing other models from Gambody 3D printing marketplace, and have the Iron Giant, Ratchet from Ratchet & Clank video game, and a version of the Dalek sitting on my shelves already. I have the Red Dwarf ship on my list to print at some point, but I’ve run out of room for it at the moment!

The Gambody team would love to thank Brian Spradlin for taking the time to answer our questions, share his experience on lighting up his 3D printed Borg Cube, and let us look at all the impressive photos of the process. If you are a big fan of Star Trek TNG and the amazing universe that this TV series laid the start to, you can discover many great Star Trek 3D models on Gambody 3D printing marketplace and breathe life into your favorite spaceships.
Feel free to share photos and videos as well as tips on completing your projects with other enthusiasts in Gambody 3D Printing Community on Facebook. Maybe you also want to light up your fantastic Borg Cube following Spradlin’s advice. Make it so!
(Visited 107 times, 1 visits today)
