

In this tutorial, I’ll guide you through setting up the DJI O4 Lite Air Unit in any FPV drone. This includes wiring it to the flight controller, configuring Betaflight OSD, and sharing useful tips along with the best transmission and camera settings to achieve optimal performance for your specific needs.

Still debating whether to get the DJI O4 Lite? Check out my review: https://oscarliang.com/dji-o4-air-unit-lite/
Where to Buy?
You can purchase the DJI O4 Lite Air Unit from the following retailers:
Currently, parts are not sold separately, meaning if you break the camera or transmission module, you’d have to replace the entire air unit. Hopefully, spare parts will become available in the future to make repairs more affordable. However, the antenna is easily removable and replaceable.

Mounting
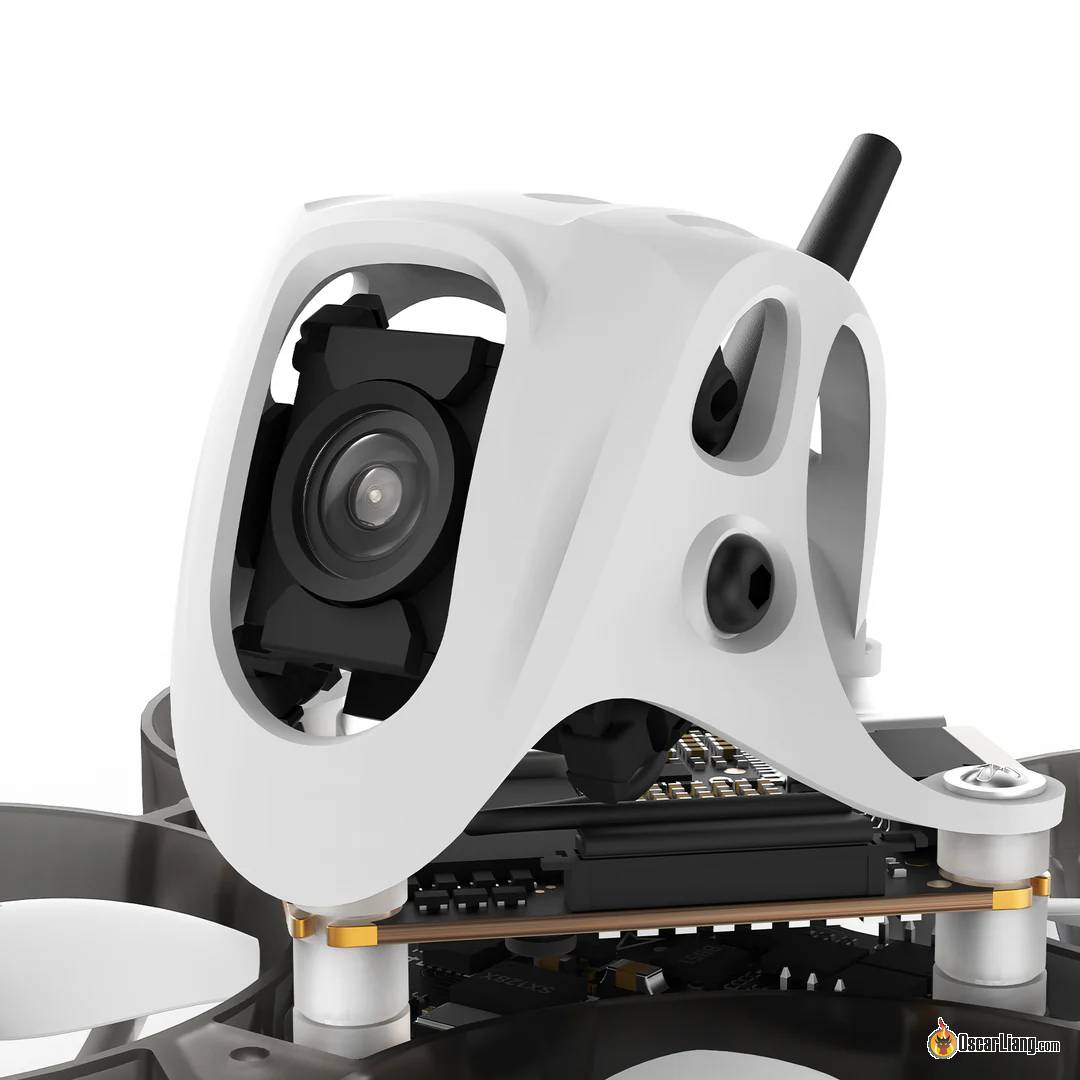
The O4 Lite Air Unit is designed for micro-sized FPV drones, such as tinywhoop and ultralight quads. Since these small drones typically use a flight controller with a 25.5×25.5mm mounting pattern, it’s possible to mount the O4 AU directly on top as part of a single stack.
Many modern frames have dedicated spaces in the rear for mounting the VTX, but this may not always work for the O4 Lite due to its short camera cable (only 5cm long).
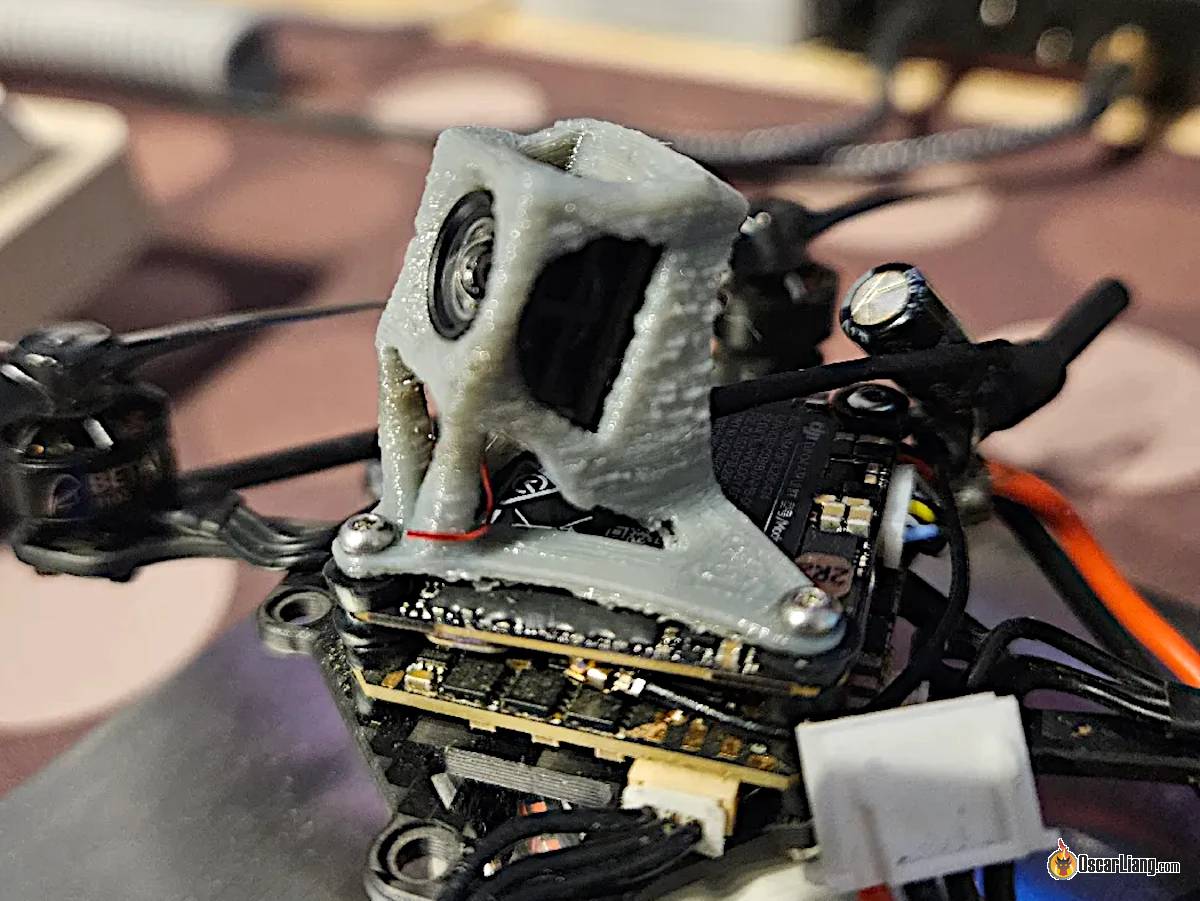
Image Credit: Calpulz
The real challenge is mounting the camera due to its unconventional mounting system. If you have access to a 3D printer, you could design a custom mount for your existing frame. Otherwise, you might need to purchase a new frame designed specifically for the DJI O4 Lite. Just to name a couple of these new frames:
Additionally, make sure the antenna is securely strapped to something like the canopy. The antenna is only friction-fitted, meaning the U.FL connector could pop off in a crash.
Disconnecting Camera and Antenna
It is possible to disconnect the camera from the transmission module, but the coaxial cable/connectors are glued in place. Unless you can reapply the glue after reconnection, I do not recommend disconnecting them. Removing or replacing the antenna is straightforward though.
Powering the O4 Lite
The O4 Air Unit (Lite) can be powered directly from a 1S, 2S, or 3S LiPo battery (3.7–13.2V). However, the Air Unit may become unreliable or even shut down when the voltage drops below 3.7V. Therefore, it is not recommended to power the O4 Air Unit directly from a 1S LiPo. Instead, power it from a stable 5V or 9V BEC on the flight controller, which also provides additional protection against voltage spikes.
Power requirements:
- Max power consumption: ~6W
- Current draw at 700mW: 5V 1.2A or 9V 0.67A
- Recommended BEC: Minimum 5V 2A BEC or 9V 1A BEC (If you have other power-hungry devices, consider using a higher-rated BEC)
Flight Controller Connection
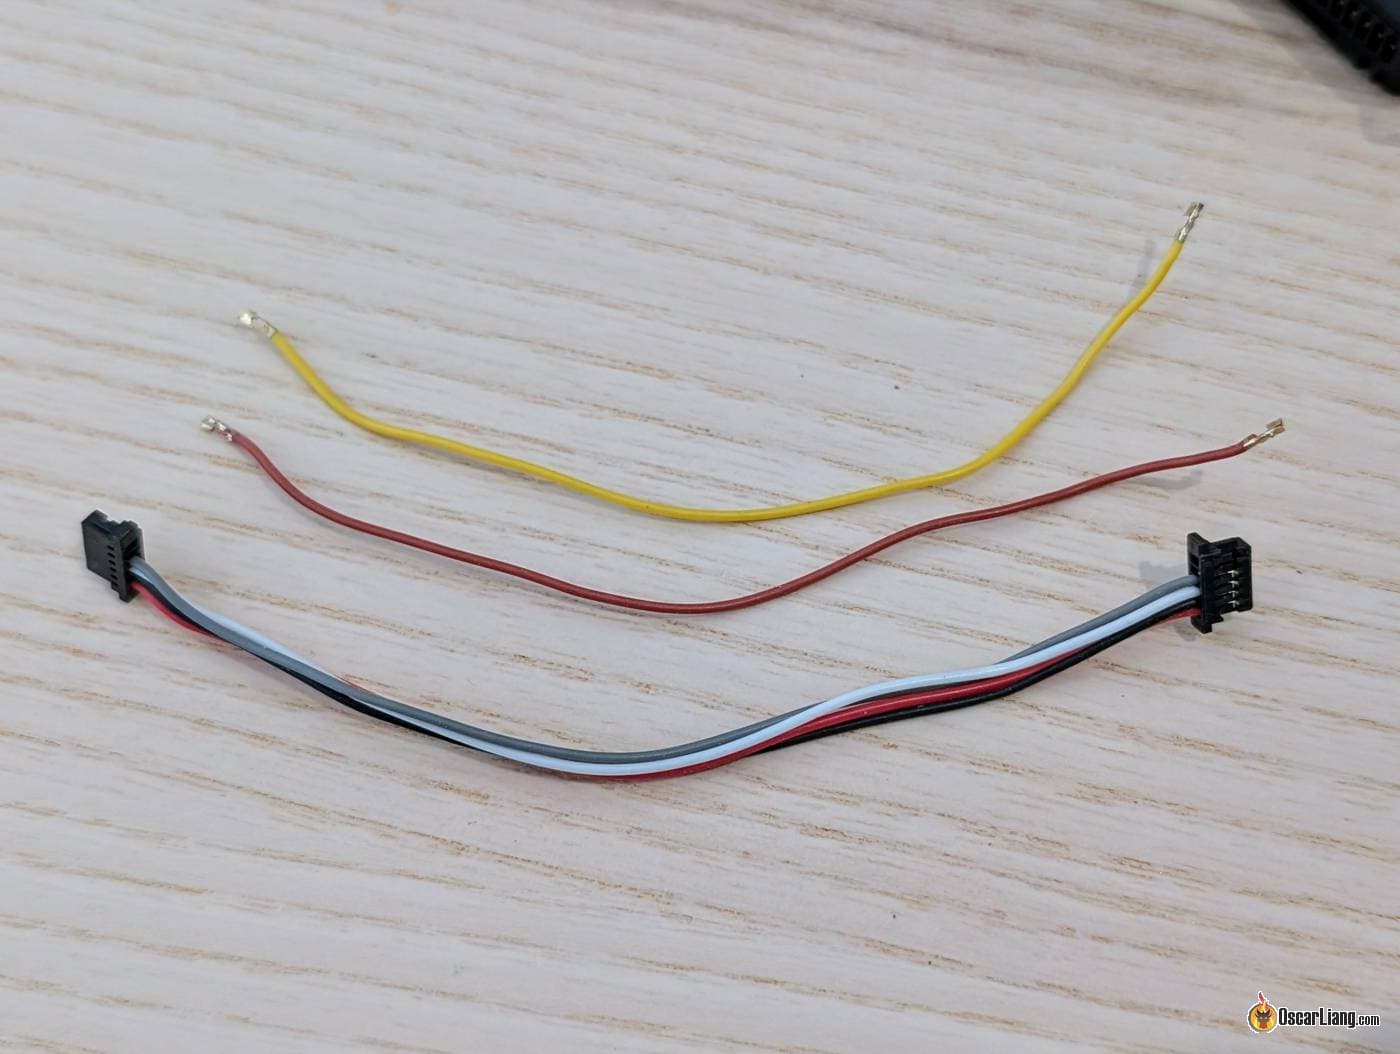
The DJI O4 Lite Air Unit uses the same 6-pin connector and pinout as the O3 and O4 Pro, making it plug-and-play with any flight controller designed for existing DJI Air Units. However, you should always double-check the wiring upon connection to avoid any surprises.
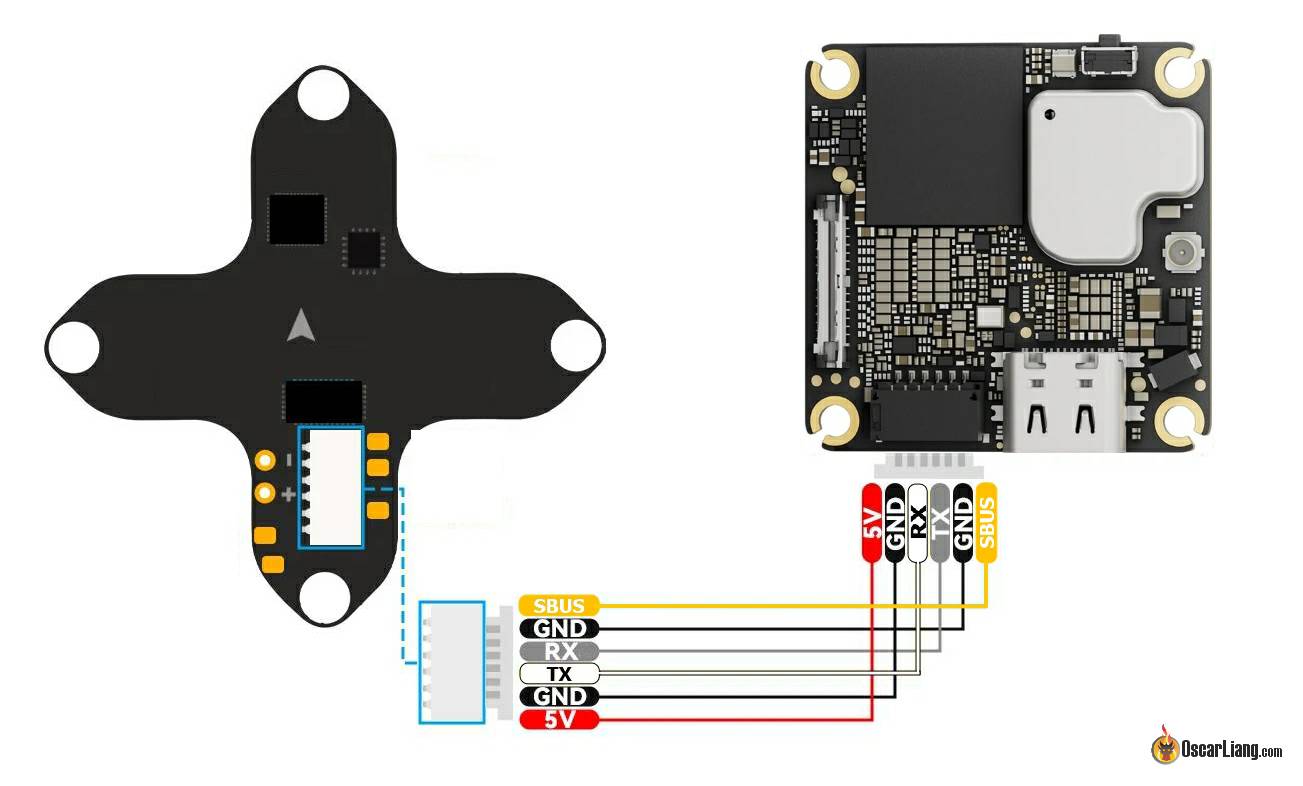
Pinout of the 6-pin connector:
- VCC: Power supply
- GND: Ground
- RX/TX: Required for OSD and telemetry (e.g., displaying battery voltage and arming detection)
- GND and SBUS: For DJI Remote Controller (optional)
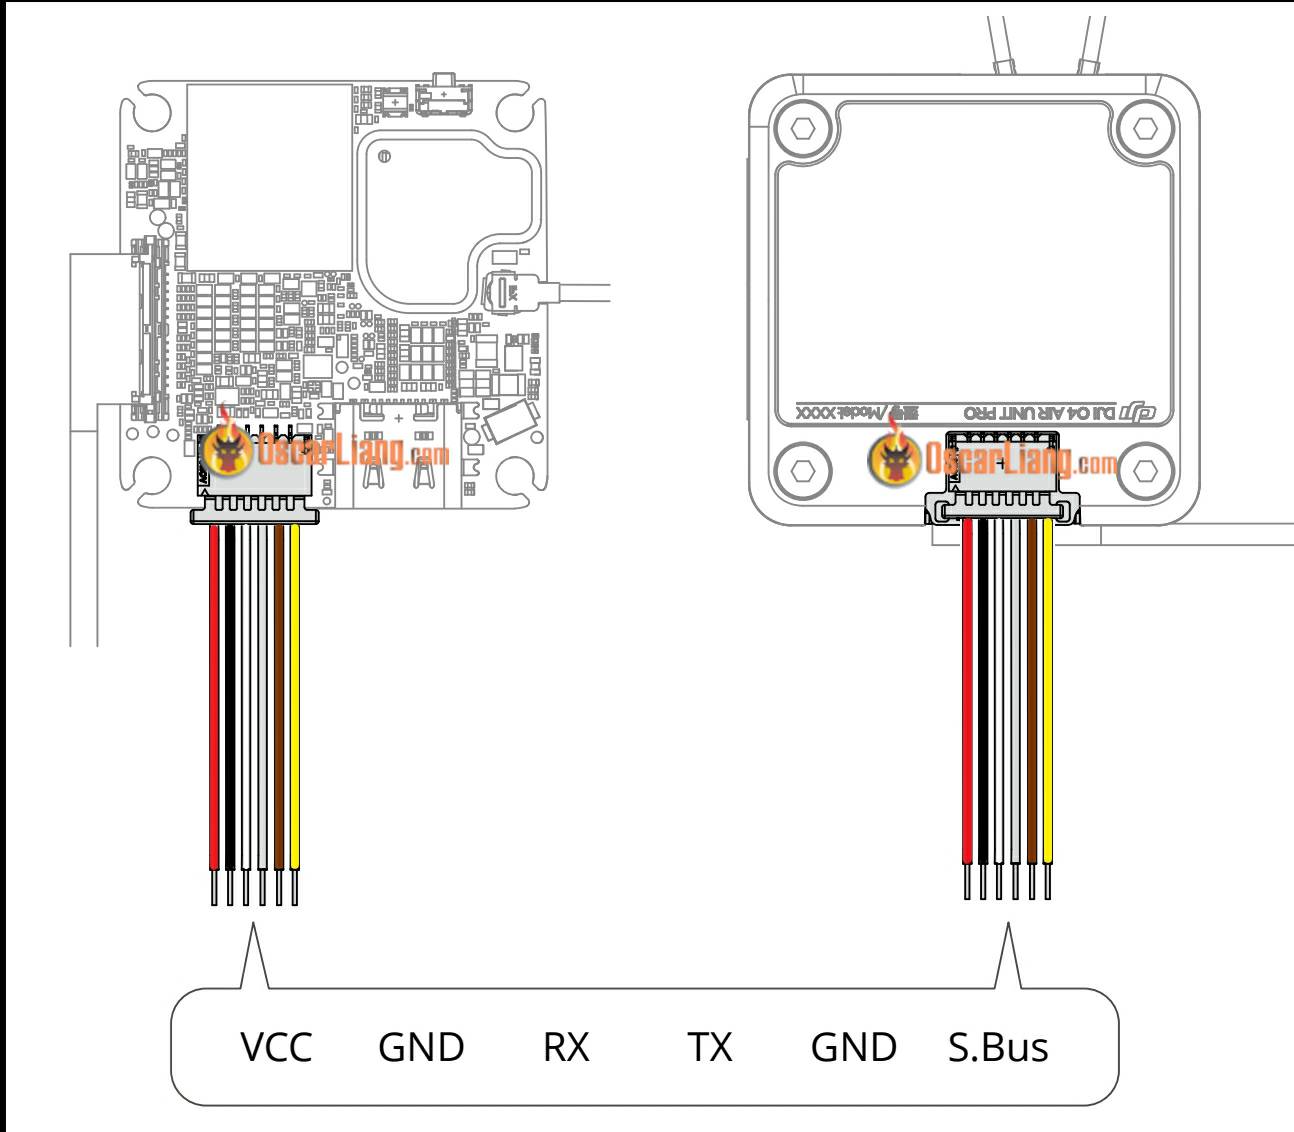
Unlike the O4 Pro, the O4 Lite does not have solder pads. If you want to solder it directly to the flight controller, you will need to cut off the connector from the cable and strip the wires.
If you are not using a DJI Remote to control the drone, and are instead using your own radio receiver, it’s recommended to remove the SBUS wire (DJI HDL) from the connector. This can prevent potential conflicts. Use a sharp tool, such as a pin or needle, to slightly lift the tab in the connector and pull the wire out. In this case you may also remove the additional ground wire (brown).
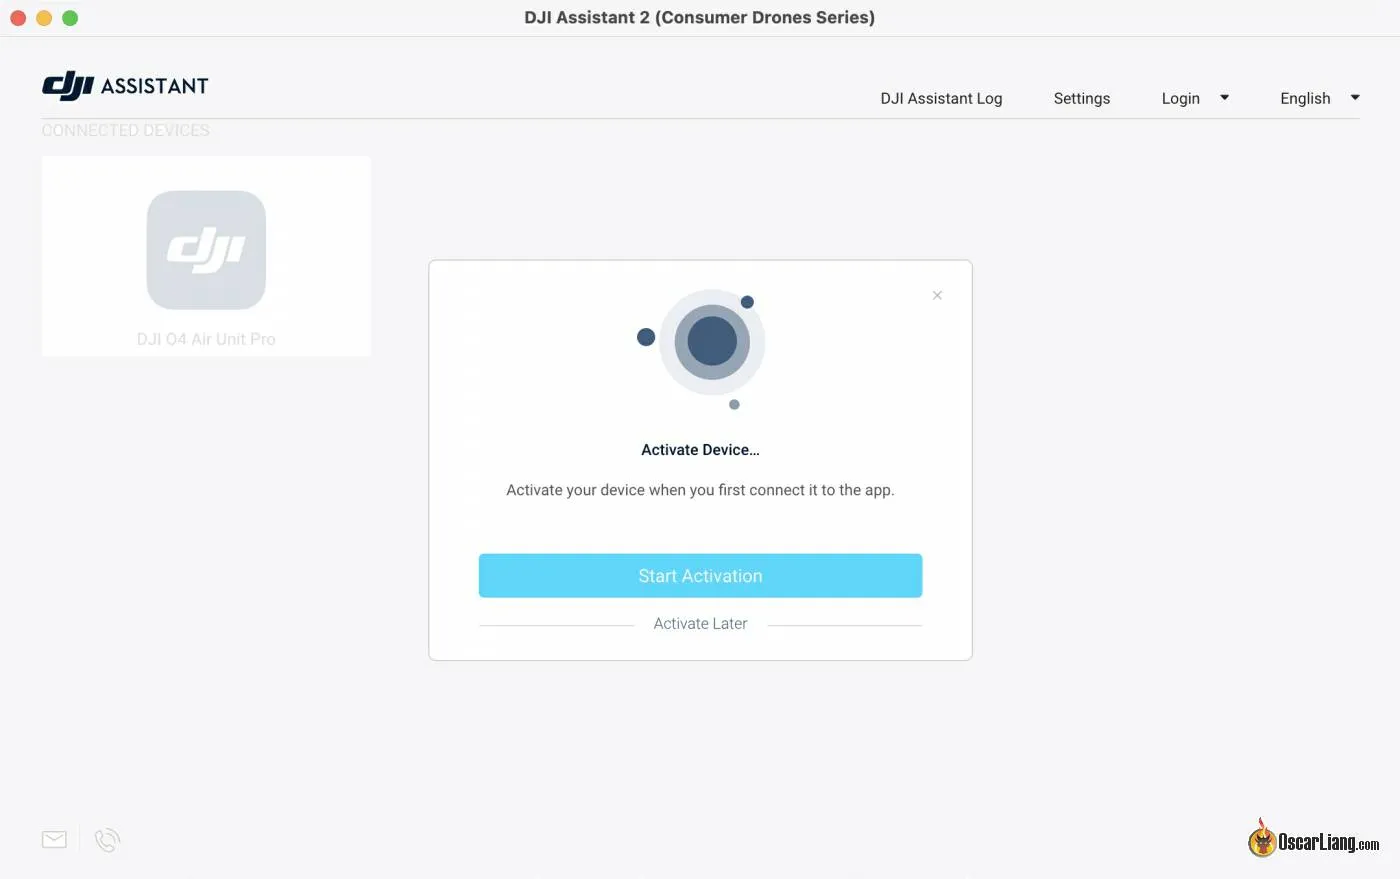
Activation
Once the O4 Lite is connected to the flight controller (FC), it’s time to activate it. If the Air Unit was previously activated, this step is not required.
Pro Tip: that the O4 Air Unit must be powered by a battery or a correctly rated power supply during activation. Unlike the O3, it cannot be activated using just the USB-C cable. Although the USB-C cable is not included, any USB-C data cable will work.
Download DJI Assistant 2 (Consumer Drone Series): https://www.dji.com/nl/downloads/softwares/dji-assistant-2-consumer-drones-series.
If you have installed it, it’s still a good idea to download and re-install the latest version.
Pro Tip: activation CANNOT be done in the DJI Fly App.
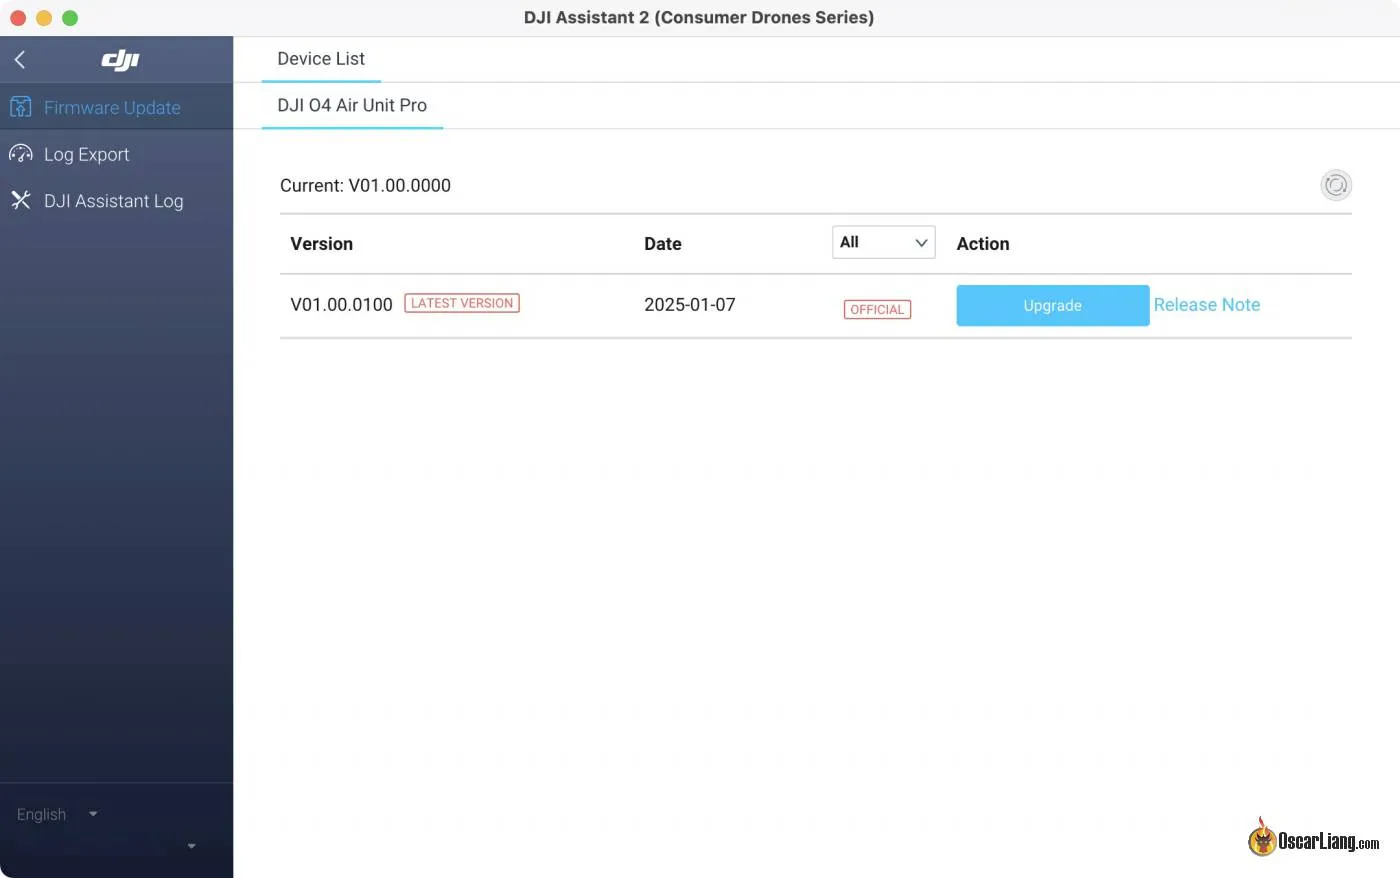
Firmware Update
While connected to DJI Assistant 2, check if new firmware is available for your O4.
Pro Tip: For firmware updates, you can safely unplug the battery during the process to avoid heating.
Pairing DJI Goggles 3 with O4 Lite
Before pairing, ensure your Goggles 3 firmware is updated to the latest version. Without this update, you won’t get the O4 Pro and O4 options in the menu. Follow these steps:
Update Firmware
- Turn on the Goggles 3 and connect them to your computer using a USB-C data cable.
- Update the firmware via DJI Assistant 2.
Pro Tip: If the Goggles 3 does not appear in DJI Assistant 2, navigate to the goggles menu:
Settings → About → OTG Wired Connection and enable it.
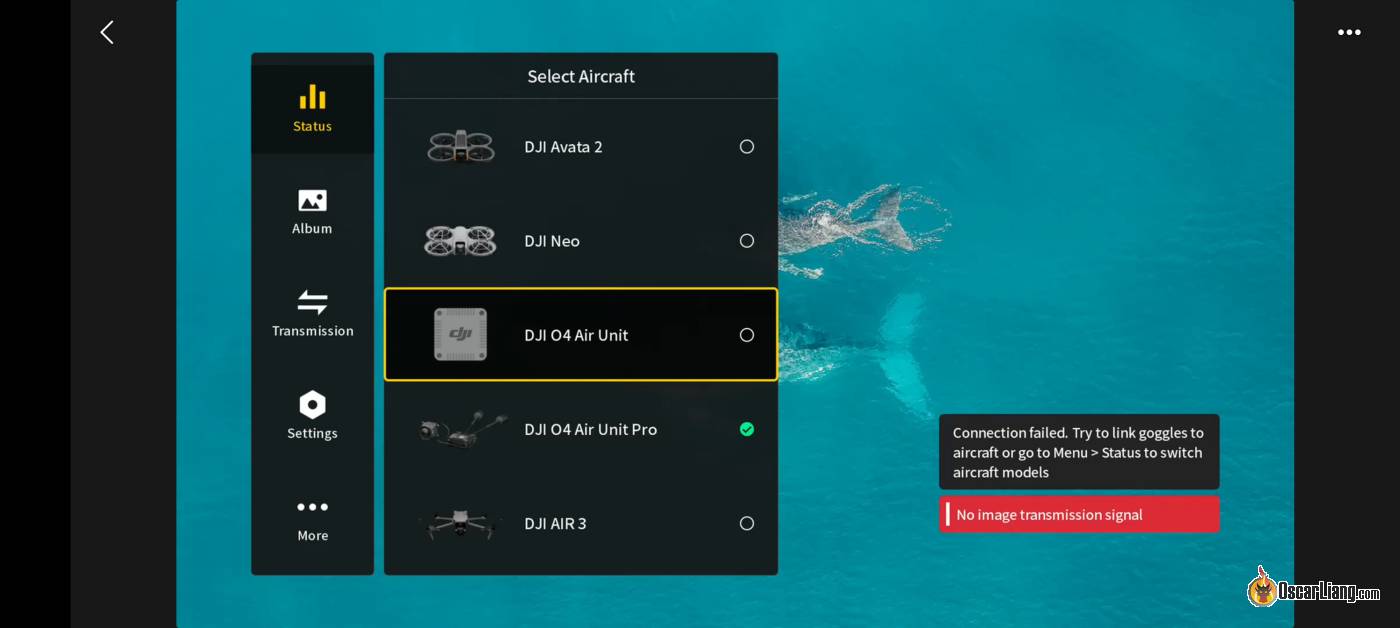
Select O4 Air Unit Pro in the Goggles Menu
- Go to the goggles menu, navigate to Status → Switch, and select “DJI O4 Air Unit.”
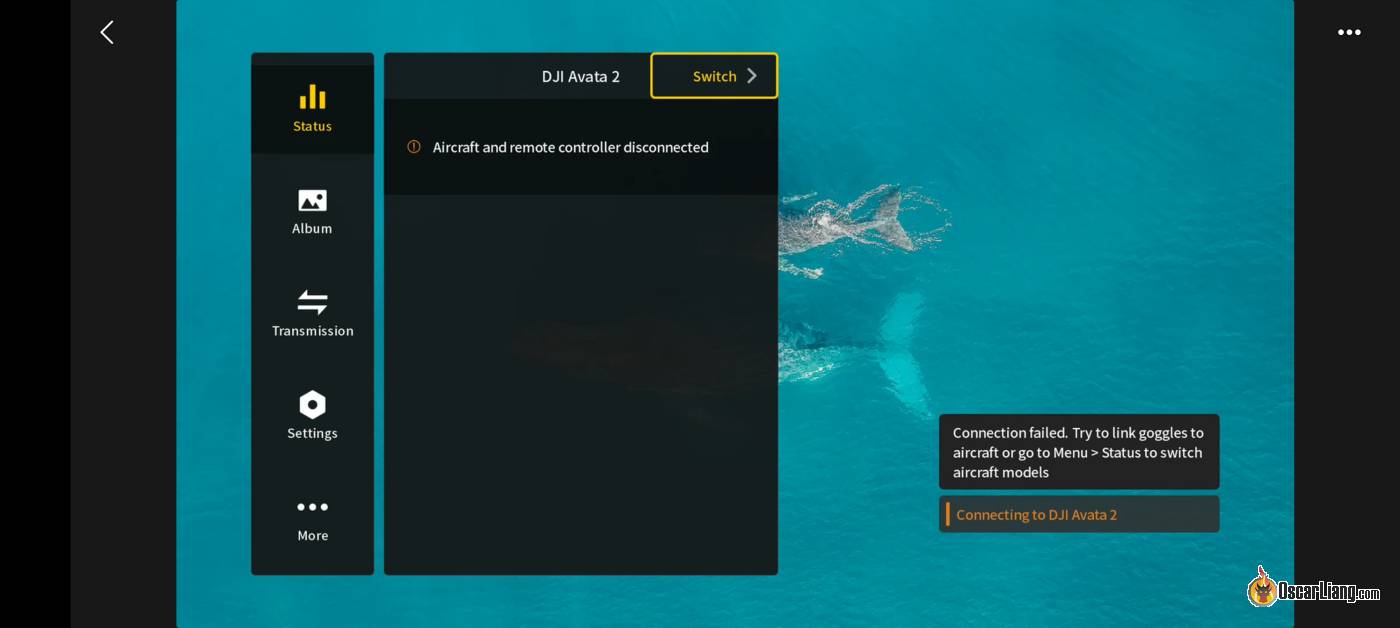
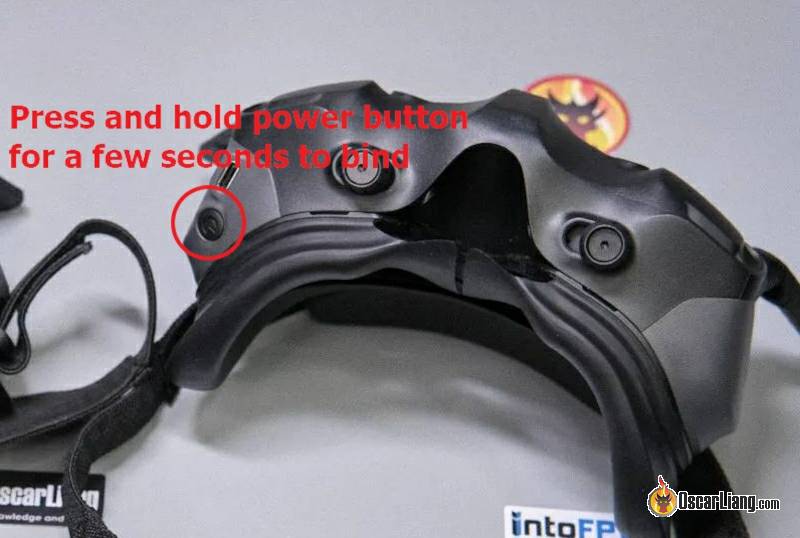
Enter Bind Mode
- Press and hold the power button on the goggles until they start beeping, indicating they are in bind mode.
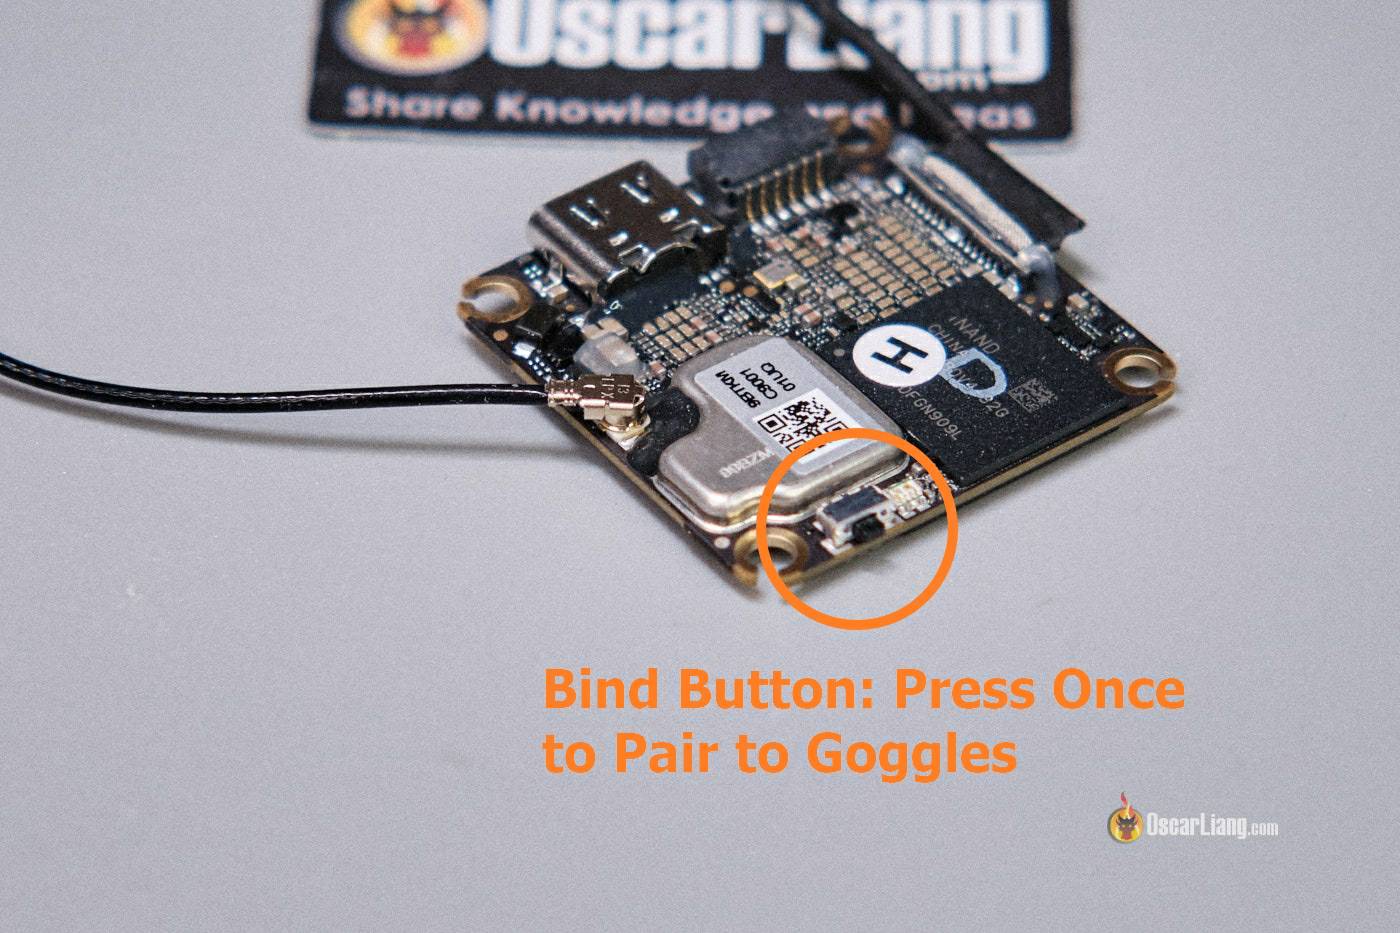
Power on the O4 Air Unit
- Wait for the LED on the Air Unit to turn red.
- Press the bind button on the Air Unit. The red LED will begin flashing slowly, indicating it is in bind mode.
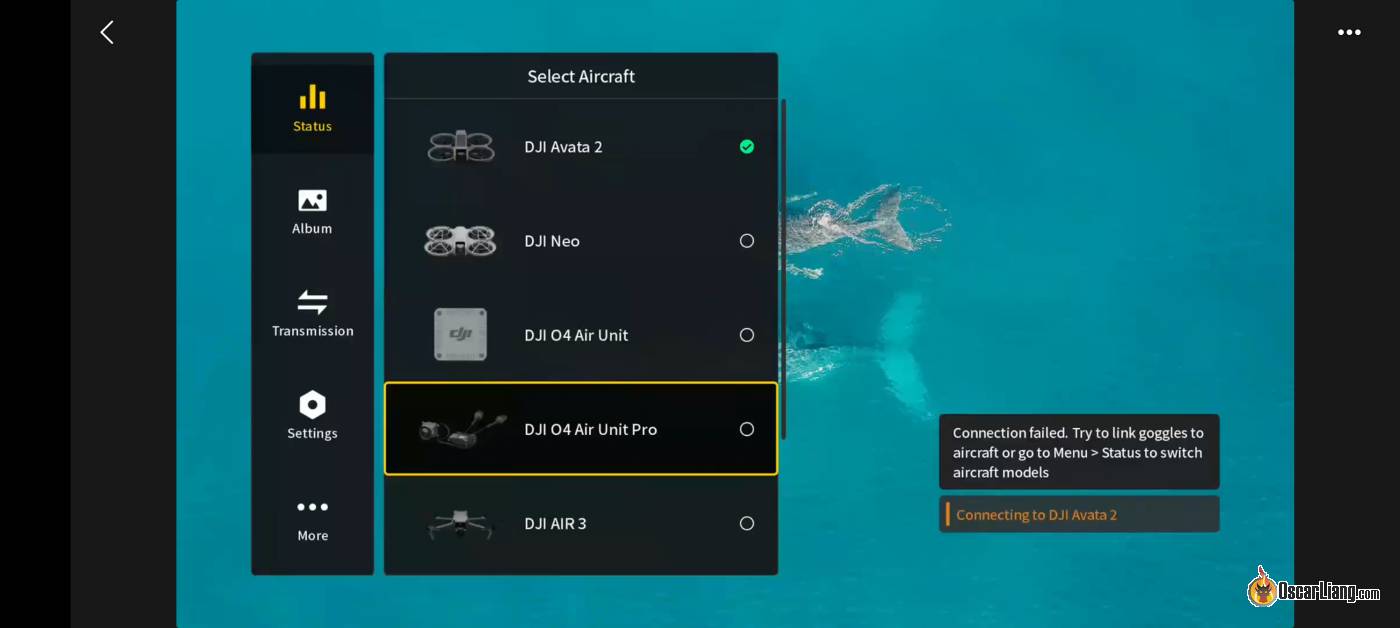
Complete Binding
- Binding is successful when the LED on the Air Unit turns solid green, and the goggles display the camera feed.
Pairing Goggles 2/Integra with O4 Lite
To use the O4 Air Unit with Goggles 2 (or Integra), you’ll need to update the firmware on both devices. And don’t worry, you will still get compatibility with the O3 Air Unit, as well as older DJI FPV Air Units and the Vista system.
Pro Tip: If you’re using a Mac and encounter connection issues (e.g., Goggles 2 not appearing in DJI Assistant 2), this is a known problem. Unfortunately, there isn’t a reliable fix. A workaround is to update using the DJI Fly App on your smartphone or switch to a Windows PC for the firmware update.
After the update, go to the goggles menu and select either O4 Air Unit or O3 Air Unit under the settings.
Press the link button between the lenses on the Goggles 2 to enter bind mode.

Power on the O4 Air Unit and wait for the LED to become red. Press the bind button on the Air Unit. The red LED will flash, indicating bind mode. Binding is successful when the LED turns solid green, and the camera feed appears in your goggles.
Switching Between Pro and Lite
If you use both the O4 Pro and O4 Lite, remember to switch between them in the goggles menu before flying. Each time you fly with a different unit, you’ll need to manually select the corresponding Air Unit in the goggles settings.
Unlock FCC Mode
If your Goggles 3 are shipped with CE mode (to comply with European regulations), they will be limited in terms of output power (only 25mW) and channels. There will be only 1 available channel in the 40MHz mode and 3 available channels in the 20MHz mode.
In FCC mode, you should have the maximum 1200mW output power option, and there should be 7 available channels in the 20MHz mode, and 3 available channels in the 40MHz and 60MHz mode.
For goggles in CE mode, it’s possible to perform the “FCC hack” to unlock higher output power (more range and signal penetration) and more channels (allows more pilots in the air at the same time), but only do this if it’s legal where you fly.
To switch to FCC mode, simply get the file “ham_cfg_support”, unzip it to the root directory of the SD card and put it in the goggles, power on goggles, that’s it.
Download file here: https://drive.google.com/file/d/1ug2U_i5kdrKQQ2I17NLJBXm2tKQeNj5Q/view?usp=share_link
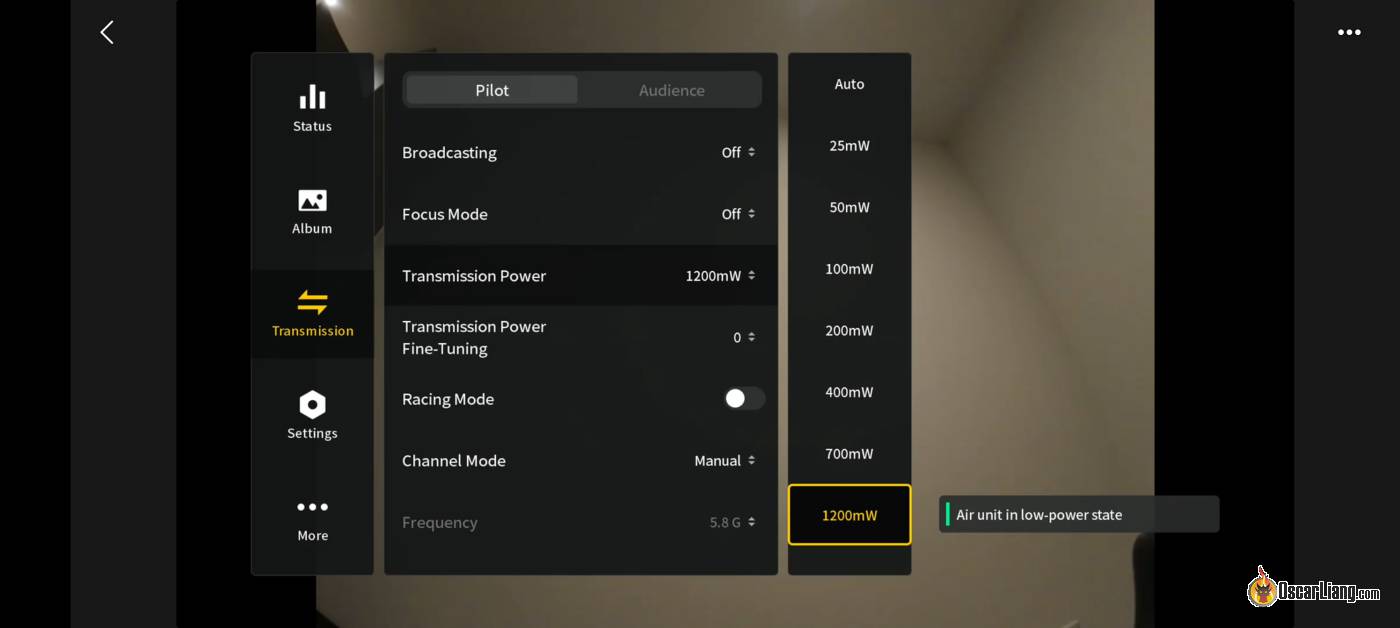
To check if you are in FCC mode, go to Settings => Transmission => Channel Mode, switch to Manual, under 40MHz or 60MHz bandwidth, you should see 3 channels available in FCC mode. If it will only show 1 channel there, you are in CE mode.
Once FCC mode is unlocked, you won’t have to do it again. You can go back to CE mode by factory reset the goggles (in the menu Settings => About).
Setup OSD in Betaflight
The DJI O4 Air Unit fully supports the Betaflight OSD, including the Betaflight OSD menu and all available OSD elements.
Go to the Presets tab, and search for “dji”, the “FPV.WTF MSP-OSD” preset should pop up. In options, select the UART you have connected to the O4 Lite Air Unit.

To enable HD OSD, go to the settings menu in the goggles, Settings > Display > Canvas Mode, and select HD OSD.
This allows you to display the OSD with smaller fonts and drag OSD elements all the way to the edges of the screen. If you select Normal Mode, the font will appear much larger.
Finally, go to the OSD tab in Betaflight Configurator. Under Video Format, ensure HD is selected.

Setup DJI Remote Controller
If you’re using a third-party radio link, you can skip this section.
Using DJI’s remote controller eliminates the need to wire a separate radio receiver to the flight controller, as the DJI O4 Air Unit also serves as an RC link. This simplifies the setup process. However, there are a few downsides to consider:
- Basic functionality: DJI’s remote controllers lack the advanced features and control precision offered by more sophisticated systems like ExpressLRS.
- Failsafe dependency: Since the video and radio signals share the same link, losing the video signal also results in a failsafe, which isn’t the case with advanced RC links like ExpressLRS that typically outperform video links significantly.
Compatible DJI Remote Controllers:
- RC2: Works exclusively with the Goggles 2 and Integra.
- RC3: Works exclusively with the Goggles 3 and N3.
Pairing the DJI Remote Controller 3:
- Power on your goggles 3 and RC3.
- Long-press the power button on both the goggles and remote controller to enter linking mode.
- Once the devices are successfully linked:
- The goggles will stop beeping and display the live view.
- The remote controller will stop beeping.
Configuring Betaflight:
- In the Ports tab, enable Serial RX for the UART connected to the SBUS wire.
- In the Receiver tab, set the protocol to SBUS (via UART).
Videos Recording
The O4 Air Unit has 23GB of onboard memory for recording flight footage. Depending on the resolution you select, it can store approximately 30 to 45 minutes of recordings. Unfortunately, it does not support micro SD cards, so make sure to offload footage regularly; otherwise, the unit might stop recording until you free up memory.
You can start recording by using the Record button in the goggles’ top menu. Alternatively, you can configure the O4 Air Unit to start recording automatically when you arm the quad in the system menu. Navigate to Settings → Camera → Advanced Camera Settings to enable this option, which many pilots find more convenient.
Available Resolutions & Frame Rates:
- 4K 60fps
- 4K 50fps
- 4K 30fps
- 1080p 120fps
- 1080p 100fps
- 1080p 60fps
- 1080p 50fps
- 1080p 30fps
Download Video
To download videos, plug in the USB cable, an external drive will appear on your computer, containing all the recorded footage. To download video off the Goggles, you should power them on first, otherwise connecting the USB cable does nothing.
Video Stabilization
Video stabilization helps smooth out flight footage by reducing shakiness and vibrations. The O4 Air Unit supports two stabilization methods: RockSteady and Gyroflow.
- RockSteady is built-in and can be enabled in the goggles’ menu. It stabilizes footage automatically during recording, offering decent results with minimal effort. To enable RockSteady, set Recording Stabilization to ON.
- Gyroflow is an open-source, software-based stabilization tool that provides more flexibility. It allows you to fine-tune stabilization settings in post-processing. With Gyroflow, the raw footage remains unstabilized, giving you full control over how much stabilization to apply. To use Gyroflow, set Recording Stabilization to OFF.
For best results with Gyroflow, use the following settings:
- Aspect Ratio: 4:3
- Camera FOV: Wide
- Recording Stabilization: OFF
Gyroflow is easy to use, and I’ve created a tutorial explaining how it works: https://oscarliang.com/gyroflow/
How to Avoid Jello and Vibration
Similar to the O3, the O4 camera is highly sensitive to vibrations, making it crucial to isolate the camera from vibration sources or eliminate vibrations altogether.
Avoid using 24kHz PWM frequency in your ESC settings, as lower PWM frequencies can increase vibrations and noise. Instead, use a higher frequency, such as 48kHz, for optimal performance.
Mounting the O4 camera directly on carbon fiber or CNC aluminum is not recommended, as vibrations can transfer directly from the motors to the camera, causing jello in your footage. Instead, use a soft mounting material that provides vibration dampening. Many new frames include silicone or rubber inserts/spacers specifically designed for mounting the O4 FPV cameras, helping to reduce vibrations significantly.
Best O4 Pro Settings
Unlike the O4 Air Unit Pro, the standard O4 Air Unit only supports one color mode: Normal. There is no D-Log M mode, which is preferred by cinematographers. While this may limit advanced color grading options, it simplifies the decision-making when choosing the best settings.
Unlike the O4 Air Unit Pro, the O4 Air Unit only has one color mode: Normal. There is no D-Log M mode which is preferred by cinetographers. But this limitation also makes our decision easier when it comes to what settings we should run.
Recommended Camera Settings for the Best FPV Experience (For those who prioritize low latency and don’t care much about recording quality):
- Aspect Ratio 4:3
- Video Quality: 1080p 100fps (offers the lowest latency)
- Camera FOV: Wide
- Auto ISO Limit: 6400
- Auto Mode
Recommended Camera Settings for the Best HD Recording (For those Using ND filter, Gyroflow stabilization, and Color grading):
- Aspect Ratio 4:3
- Video Quality: 4K 60fps (30fps might be better for low light, but it can increase latency, making accurate flying harder.)
- Camera FOV: Wide
- Recording Stabilization: OFF
- Sharpness: -2 (you can increase sharpness in post-editing if needed)
- Noise Reduction: 0 (or +1 in low-light situations to reduce noise in dark areas)
- Camera Mode: Manual
- Shutter Speed: 1/120
- Auto ISO
- Auto ISO Limit: 200 – (set this as low as possible to avoid graininess; however, too low might make the image too dark.)
- White Balance: Put White Balance on Auto first and see what the system choose, then lock in with that value, so WB is fixed during flight
Recommended Camera Settings for Decent HD Recording (For those who prefer little to no editing):
- Aspect Ratio 4:3
- Video Quality: 4K 60fps
- Camera FOV: Normal
- Auto ISO Limit: Set as low as possible for your lighting conditions. If unsure, leave it at the default (6400). Note that higher ISO may lead to grainier images in dark areas, but it ensures visibility.
- Recording Stabilization: ON
- Color: Normal
- Camera Mode: Auto
- White Balance: Auto
Recommended Transmission Settings for Solo Flying
- Race Mode: OFF
- Transmission Power: Use the highest power level legally allowed, or just set it to Auto.
- Channel Mode: Manual
- Bandwidth: 60MHz (60mbps bitrate)
Recommended Transmission Settings When Flying with Other Pilots
- When flying with other DJI pilots: Consider reducing transmission power and using smaller bandwidth.
- When flying with pilots using other FPV systems (e.g., Analog, HDZero): Enable Race Mode to reduce interference.
Race Mode
Race Mode is a feature designed specifically for FPV racing, available only on the DJI Goggles 3 and N3, but not on the Goggles 2 and Integra due to hardware limitations. It optimizes the system for low-latency performance and minimizes interference in race environments by aligning its channel frequencies to Race band. Here’s what Race Mode offers:
- Lowest Latency: Race Mode forces the system into 100fps with a 20MHz bandwidth, achieving latency as low as 20ms.
- Channel Alignment: Channels align with standard race band frequencies, making it more compatible with other FPV systems.
- Cleaner Signal: The telemetry link now operates on the same static frequency as the video signal, reducing interference with other pilots. When the Air Unit is off, the goggles stop transmitting altogether, allowing pilots to walk around without affecting others.
- Trade-offs: Narrower bandwidth and lower power output reduce range and penetration, making it unsuitable for freestyle, cinematic, or long-range flying. However, these limitations are acceptable for racing, which typically occurs in open fields.
Caution: Avoid powering on your Air Unit while others are in the air, as it momentarily sweeps across the band, potentially causing interference for those who are still in the air. For all other types of flying, normal mode offers better RF performance.
Transmission Power Fine Tune
This feature allows you to fine-tune the output power of your VTX by ±1mW to ±7mW to ensure compliance with racing event regulations. For most users, this setting isn’t necessary unless you’re attending a regulated racing event where precise power levels are required.
Spectator Mode
The Spectator Mode lets you watch other pilots flying with the O4 Air Unit, but it comes with compatibility limitations:
- Goggles 3 and N3 users can only spectate other pilots using G3 and N3.
- Goggles 2 and Integra can only spectate other pilots using G2 and Integra.
Spectator Mode does not work across these two generations, so ensure you’re using the same generation goggles as the pilot you want to spectate.
Conclusion
Setting up the DJI O4 Lite Air Unit for your FPV drone is straightforward, especially if you follow the wiring, mounting, and configuration steps outlined in this guide. While the O4 Lite has some limitations compared to the O4 Pro, it remains a powerful and lightweight option for micro FPV drones. Make sure to regularly offload recorded footage, optimize mounting for the antenna and camera, and choose a reliable power source to ensure the best performance. Happy flying!
