

Jupyter MCP Server is an extension for Jupyter environments that integrates LLMs with real-time coding sessions. By implementing the Model Context Protocol (MCP), it enables AI models to interact with Jupyter’s kernel, file system, and terminal in a secure and context-aware manner. This blog will explore how you can use Jupyter MCP Server within your system.
What are MCP Servers and why do we need MCP Servers?
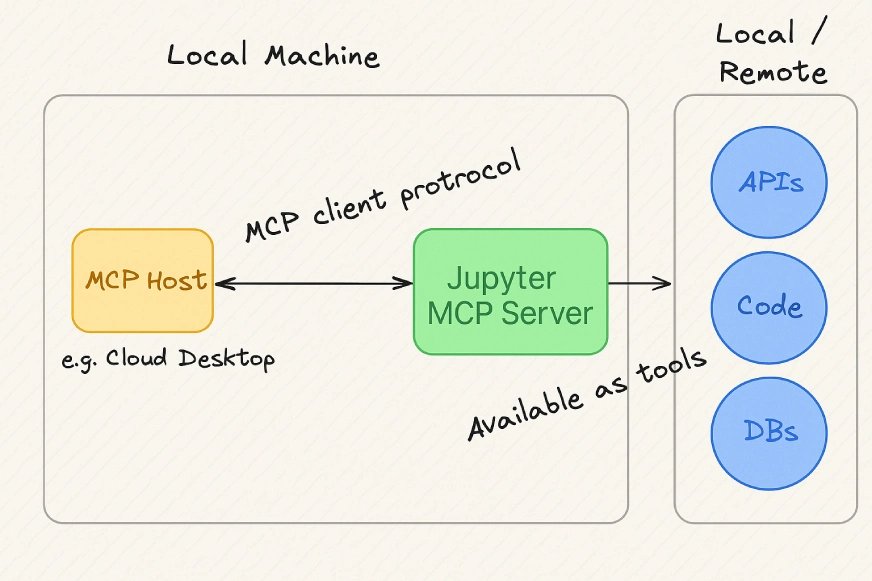
MCP (Model Context Protocol) Servers are dedicated go-betweens that facilitate communication between AI assistants and applications or environments outside of them. They allow AI models to run in a state-aware manner, offering them real-time context such as variable values, code history, datasets, and results of execution.
Without MCP servers, AI models operate in a vacuum with no knowledge of pre-set variables. This isolation constrains their ability and potential for making mistakes. MCP servers address this issue by providing AI with the power to reason, perform, and improve in a real-time environment, enabling them to become more functional, precise, and effective.
What is Jupyter MCP Server?

Jupyter MCP Server is a tool that acts as a bridge between a large language model and the user’s live Jupyter environment by primarily using the Model Context Protocol (MCP). It eliminates the limitations of models by removing the need for copying and pasting code and data. MCP has a secure protocol through which models can access and interact with various components of a Jupyter ecosystem. Thus, opening the concept of integrated, context-aware, and powerful AI-driven assistance.
Features of Jupyter MCP Server
Through the Model Context Protocol (MCP), the Jupyter MCP Server provides a structured way for external applications to interact with core Jupyter components.
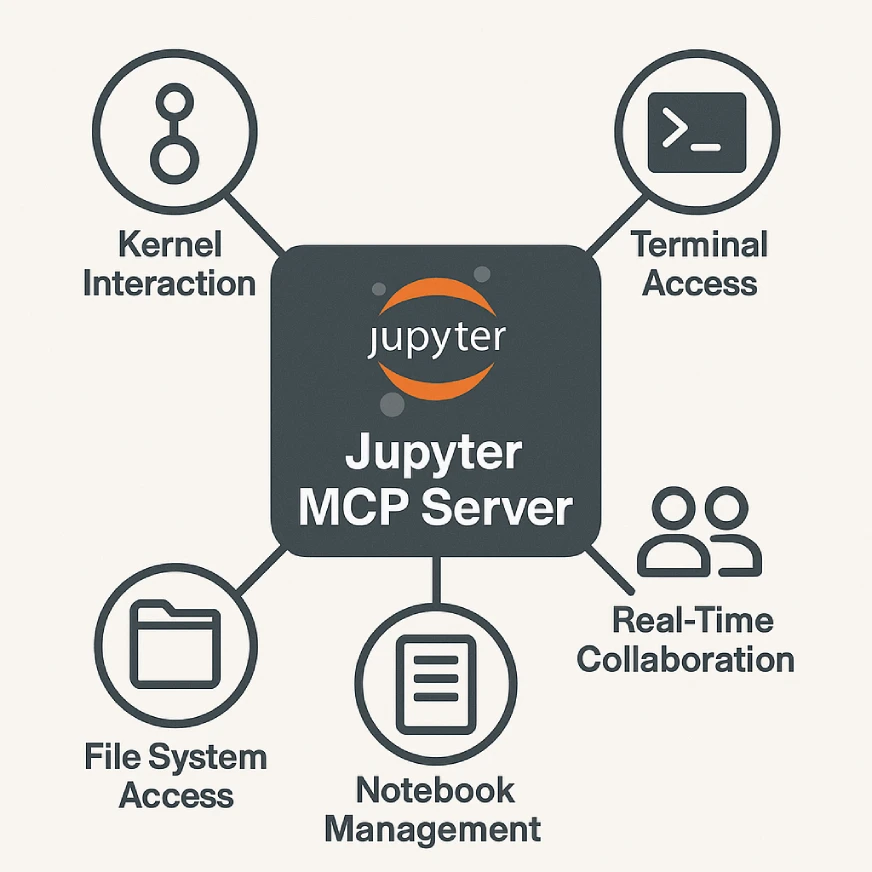
- Kernel Interaction: Supports execution of code within active Jupyter kernels, retrieval of variable states, and management of kernel lifecycle.
- File System Access: Provides controlled access to the user’s workspace, allowing reading, writing, and management of files and directories through Jupyter’s Content Manager.
- Terminal Access: Allows interaction with Jupyter’s terminal sessions, allowing execution of shell commands, package installations, and automation of system tasks
- Real-Time- Collaboration: Allows multiple users or AI agents to view and edit notebooks simultaneously.
- Notebook Management: Efficient notebook management includes saving and retrieving notebook information, ensuring data integrity and accessibility.
Let’s now understand some of these features in detail.
Key Functionalities of Jupyter MCP Server
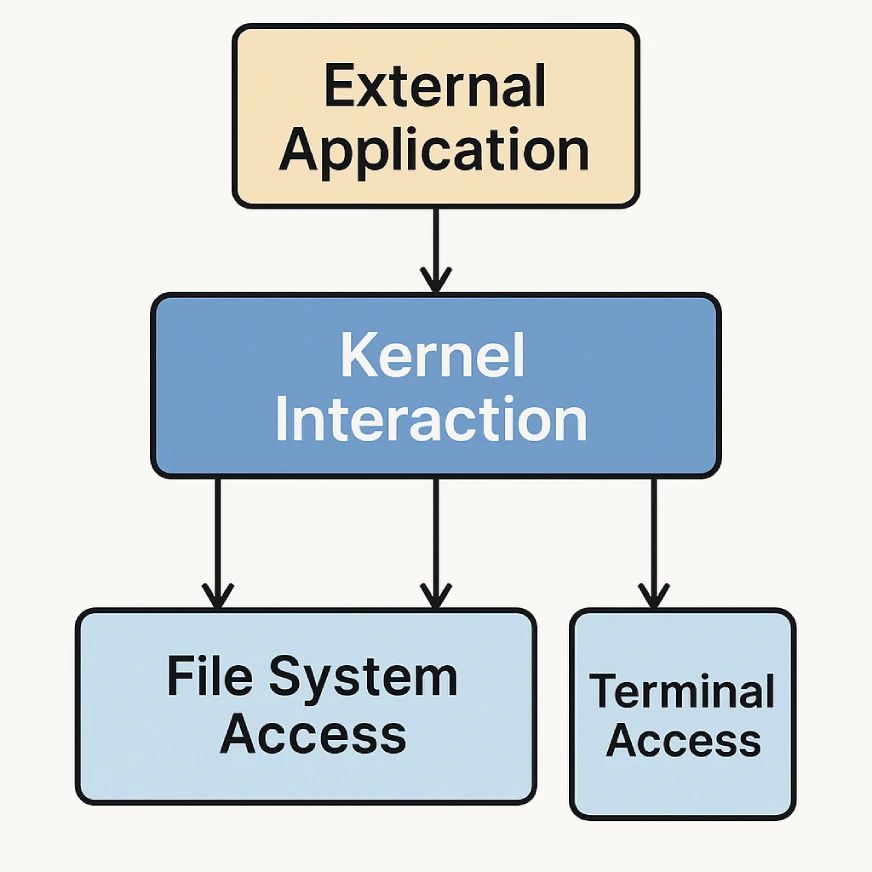
The system consists of three main components: kernel Interaction, File System Access, and Terminal Access. These components enable external applications to interface with Jupyter environments by running code, managing files, and controlling terminal sessions, respectively. In this section, we will understand each one of them in detail:
Kernel Interaction
It lets Jupyter MCP Server run code inside the user’s active kernels. It also inspects kernel state, retrieves execution results, and even manages kernel lifecycle.
How it works: The MCP Client sends requests to the MCP API, specifying the target kernel and the action. Then, the MCP server communicates with Jupyter’s kernel Manager to process the request.
Possible Actions:
- Running code cells
- Retrieving variable values
- Checking kernel status
- Interrupting or restarting kernels
File System Access
It provides controlled access to the user’s workspace, allowing external applications to read, write, or manage files and directories.
How it works: The MCP client requests file operations under the rules set by Jupyter’s Content Manager and MCP’s security policies.
Possible Actions:
- Reading file contents
- Writing or modifying files
- Creating or deleting files and folders
Terminal Access
It allows Jupyter MCP Server to interact with Jupyter’s terminal sessions.
How it works: The MCP client sends commands to a specific terminal session, and Jupyter’s Terminal Manager processes the request, returning any output.
Possible Actions:
- Running shell commands
- Installing packages
- Managing background processes
- Automating system tasks
How to Integrate Jupyter MCP Server?
This section outlines the steps required for the integration of the Jupyter MCP Server. But before diving into the installation and configuration process, let’s first review the prerequisites needed to set up the Jupyter MCP Server properly.
Once the prerequisites are met, we’ll proceed with the installation and setup steps.
Prerequisites
- Python 3.8 or above: The server is built on modern Python features and requires an up-to-date environment
- Jupyter Server: MCP Server operates as an extension of the Jupyter Server. If not already installed, you can add it using the following command.
pip install jupyter-serverInstallation
Since you’re done with the prerequisites, let’s perform the steps to download Jupyter MCP Server.
1. Download
There are two ways in which you can download the Jupyter MCP server
Standard Installation
Installing Jupyter MCP Server directly from PyPI using pip:
pip install jupyter-mcp-serverDevelopment Installation
You can also clone the source code repository from here
Step 1: Clone the above-mentioned repository
git clone https://github.com/datalayer/jupyter-mcp-server.git
cd jupyter-mcp-server
Step 2: Download Editable Mode: This allows you to make changes in the source code that will be reflected.
Use the -e flag with pip to install the package in editable mode.
Pip install -eIf you plan to run tests and contribute, you can use the following code:
Pip install -e “.[dev]” 2. Activate Extension
Once installed (either the way explained above), you need to enable the extension for the Jupyter server. This loads and uses the MCP server functionality. Modifying Jupyter configurations, and updating the list of active extensions with the MCP server.
jupyter server extension enable jupyter_mcp_server Once done with the above steps, you can verify your installation with the Jupyter server extension list.
jupyter server extension listPro tip: If you see jupyter_mcp_server in the list, then it’s activated.
Jupyter MCP Server Working
The Jupyter MCP Server won’t be a visible interface instead, it is inside JupyterLAB or Notebook. It offers an HTTP API that other tools, such as Claude Desktop, AI models, backends, or plugins.
When using Claude Desktop, make changes in the claude_desktop_config.json. The TOKEN value and NOTEBOOK_PATH can be obtained from the terminal once you run your Jupyter notebook
Code for Windows:
{

  "mcpServers": {

    "jupyter": {

      "command": "docker",

      "args": [

        "run",

        "-i",

        "--rm",

        "-e",

        "SERVER_URL",

        "-e",

        "TOKEN",

        "-e",

        "NOTEBOOK_PATH",

        "datalayer/jupyter-mcp-server:latest"

      ],

      "env": {

        "SERVER_URL": "http://host.docker.internal:8888",

        "TOKEN": "MY_TOKEN",

        "NOTEBOOK_PATH": "notebook.ipynb"

      }

    }

  }

}
Code for Linux:
CLAUDE_CONFIG=${HOME}/.config/Claude/claude_desktop_config.json

cat < $CLAUDE_CONFIG

{

  "mcpServers": {

    "jupyter": {

      "command": "docker",

      "args": [

        "run",

        "-i",

        "--rm",

        "-e",

        "SERVER_URL",

        "-e",

        "TOKEN",

        "-e",

        "NOTEBOOK_PATH",

        "--network=host",

        "datalayer/jupyter-mcp-server:latest"

      ],

      "env": {

        "SERVER_URL": "http://localhost:8888",

        "TOKEN": "MY_TOKEN",

        "NOTEBOOK_PATH": "notebook.ipynb"

      }

    }

  }

}

EOF

cat $CLAUDE_CONFIG
Once approved, if it wants to interact with your Jupyter session, it sends a request to this API. The MCP Server handles the request by checking if it’s allowed, communicating with the appropriate part of Jupyter, such as the kernel, file system, or terminal, and sending back the necessary response.
The API endpoint provided by the MCP extension, which lives at /mcp/v1, is just an added path to your Jupyter Server’s base URL.
So, if your Jupyter server is running locally at http://localhost:8888/, you can find the MCP API at http://localhost:8888/mcp/v1. This is where external tools like the Jupyter MCP server will reach out to communicate with your Jupyter environment.
HTTP requests are sent by the Jupyter MCP Server, like GET, POST, PUT, or DELETE, depending on the task. Each request goes to a specific subpath under /mcp/v1. These request patterns and data structures make up what’s known as the Model Context Protocol (MCP). For more details, you can refer to the main README file in the project explaining the role of the endpoint.
Hands-on Application
In the hands-on, we will see how to:
- Add code cells: These are sections where you can write and run the code.
- Run your code: Just hit a button to see the results instantly
- Add text with markdown: Use markdown cells to write notes, explanations, or headings to make your work look organized.
Source: LinkedIn
It’s like having a notebook perfect for learning and experimenting.
Context Management and Security of Jupyter MCP
MCP isn’t about enabling access, it ensures controlled and secure access. The protocol enforces authorization and scoping, i.e., limiting access to what’s explicitly allowed. Users have visibility and control over what applications can access their session and what they do. This prevents unauthorized access, protects user data, and keeps the Jupyter environment secure.
Conclusion
Hope you found Jupyter MCP Server tutorial helpful! The Jupyter MCP Server brings smarter, AI-powered interactions to your Jupyter environment. It uses the Model Context Protocol (MCP) to do this safely and in a standardized way. The server is already available and easy to set up. I believe that as adoption grows, we can expect more intelligent, context-aware tools that don’t just assist but truly understand our workflow. Hence, bridging the gap between powerful AI models and dynamic environments.
Data Scientist | AWS Certified Solutions Architect | AI & ML Innovator
As a Data Scientist at Analytics Vidhya, I specialize in Machine Learning, Deep Learning, and AI-driven solutions, leveraging NLP, computer vision, and cloud technologies to build scalable applications.
With a B.Tech in Computer Science (Data Science) from VIT and certifications like AWS Certified Solutions Architect and TensorFlow, my work spans Generative AI, Anomaly Detection, Fake News Detection, and Emotion Recognition. Passionate about innovation, I strive to develop intelligent systems that shape the future of AI.
Login to continue reading and enjoy expert-curated content.
